외부 시스템 연동
exemONE에서는 알람 발생 시 다양한 외부 채널로 알림을 전송하거나, 타 제품과 데이터를 연계하는 기능을 제공합니다. 크게 Notification 연동과 제품(Product) 연동 두 가지로 나뉩니다.
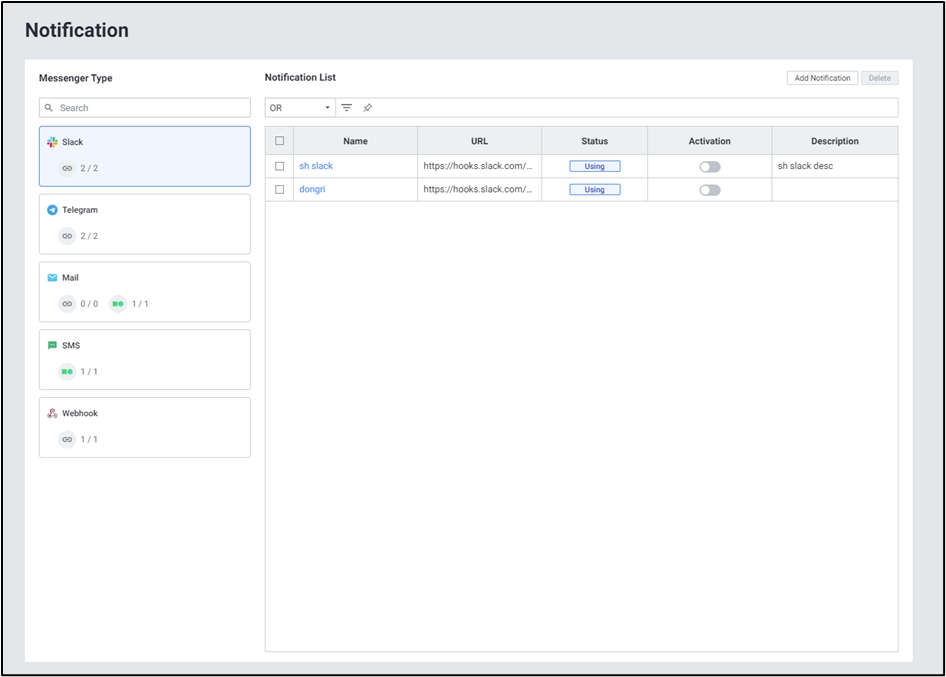
1. Webhook 연동
메뉴 경로: Setting > Alert > Notification > Webhook
Webhook은 알람 발생 정보를 외부 HTTP 엔드포인트로 전송하는 범용 연동 방식입니다.
설정 단계
- Setting > Alert > Notification 메뉴로 이동합니다.
- Messenger Type에서 Webhook을 선택합니다.
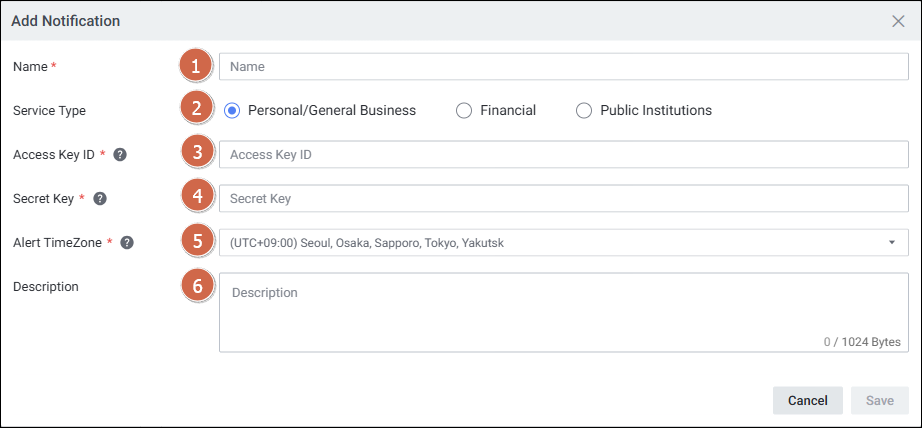
- Add Notification 버튼을 클릭합니다.
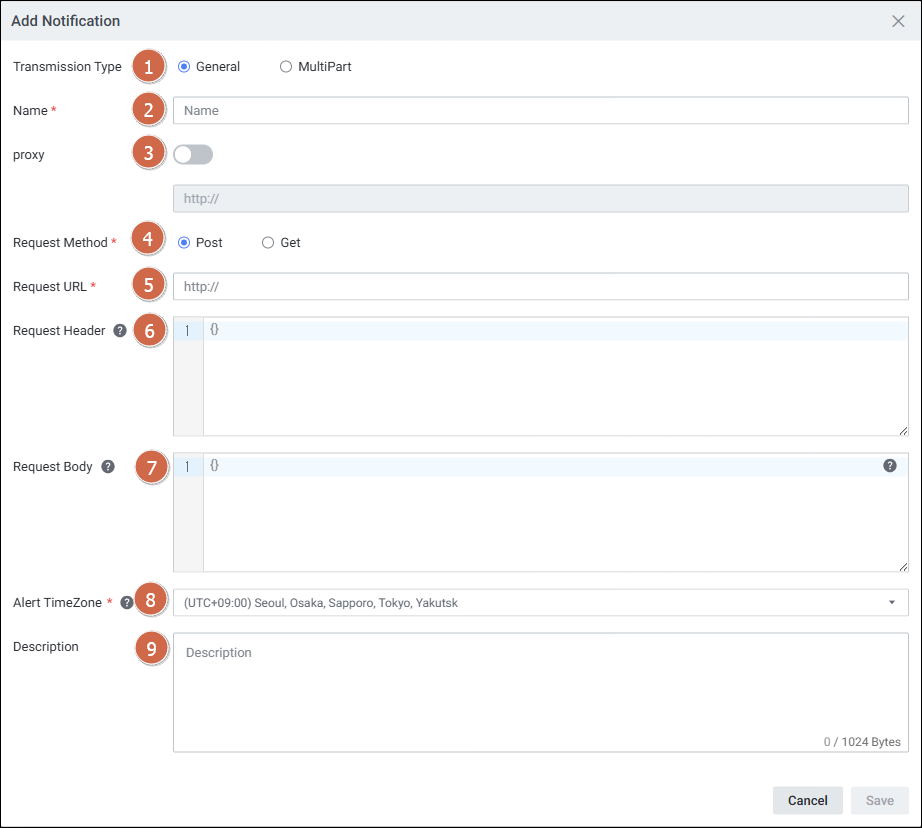
- 다음 항목을 설정합니다:
| 항목 | 설명 |
|---|---|
| Transmission Type | 전송 방식 선택 |
| Name | Notification 이름 |
| Proxy | 프록시 설정 (선택) |
| Request Method | Post / Get |
| Request URL | 알림을 수신할 URL |
| Request Header | 웹훅 서비스에서 안내하는 Header (Key:Value 형식, 행 단위 구분) |
| Request Body | 웹훅 서비스 포맷에 맞춰 작성 |
| Alert TimeZone | 알람 발생 시간 표준 시간대 |
사용 가능한 Alert Parameter
$alert$title$: Notification Title 내용$alert$message$: Notification Message 내용$alert$rule_name$: 알람 Rule Name$alert$trigger_time$: 알람 발생 시간$alert$alert_name$: 알람 발생 지표 이름$alert$targets$: 알람 대상$alert$level$: 알람 발생 레벨 (critical, warning 등)$alert$value$: 알람 발생 값 ($alert$value:1$로 소수점 자릿수 지정 가능)$alert$fixed_content$: Write Content 전체 내용
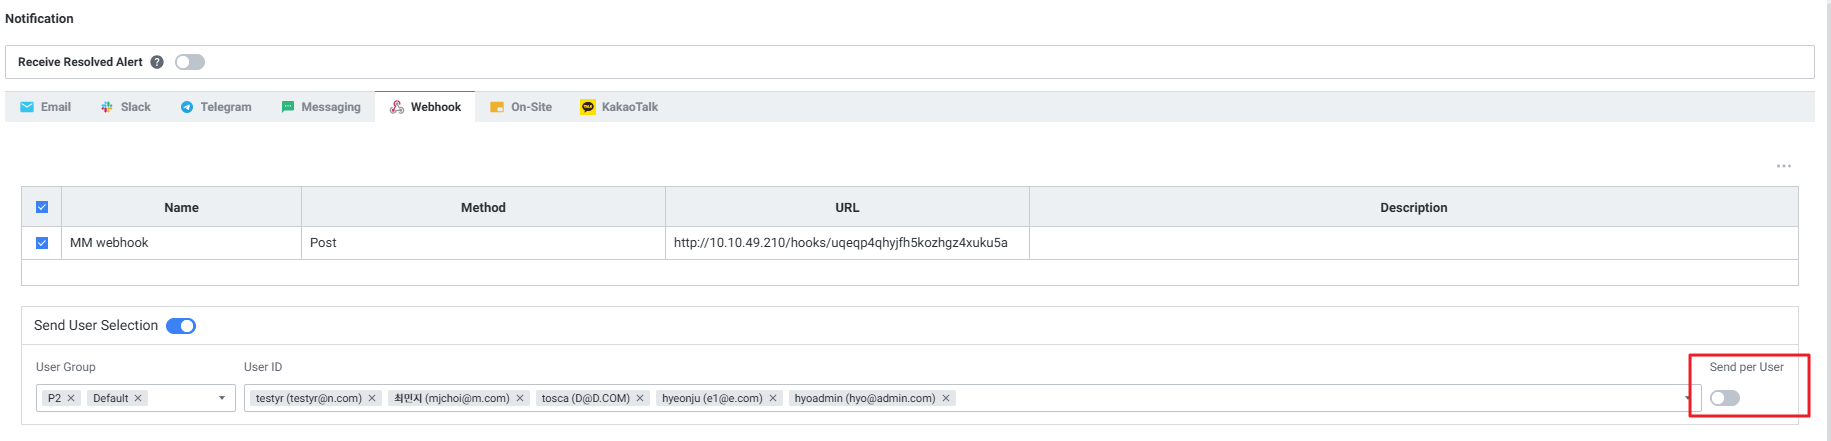
User Parameter (사용자별 발송)
$user$user_name$: 수신 사용자 이름$user$user_email$: 수신 사용자 메일 주소$user$user_phone$: 수신 사용자 휴대폰 번호
Send per User 옵션 비활성화 시, $user$user_name:{숫자}$, $user$user_email:{숫자}$ 형태로 개별 사용자 지정 발송도 가능합니다.
Webhook TLS 적용 (보안 연동)
exemone-alerter v3.0.412.7.0 이상에서 지원됩니다.
Docker 환경:
# 파일: ${EXEMONE_HOME}/docker-compose.yml
alerter:
  environment:
    EXEMONE_WEBHOOK_NOTIFIER_INSECURE_SKIP_VERIFY: true
${EXEMONE_HOME}/scripts/restart.sh alerter
Binary 환경:
# 파일: ${EXEMONE_HOME}/services/exemone-alerter/.env
EXEMONE_WEBHOOK_NOTIFIER_INSECURE_SKIP_VERIFY=true
${EXEMONE_HOME}/.onectl restart alerter
Webhook Request Body 암호화
exemone-alerter v3.0.508.59 이상에서 지원되며, AES256 암호화를 적용합니다.
${EXEMONE_HOME}/containers/exemone-alerter/configs/alerter.yaml에 설정 추가:
messenger-cipher:
  enabled: true
  key: ''  # 96자리 hex 키 (첫 64자리 = AES 키, 다음 32자리 = IV)
- alerter 재구동
- Webhook URL이
/massenger로 시작하고 Request Header가plain/text인 경우 Payload가 암호화됩니다.

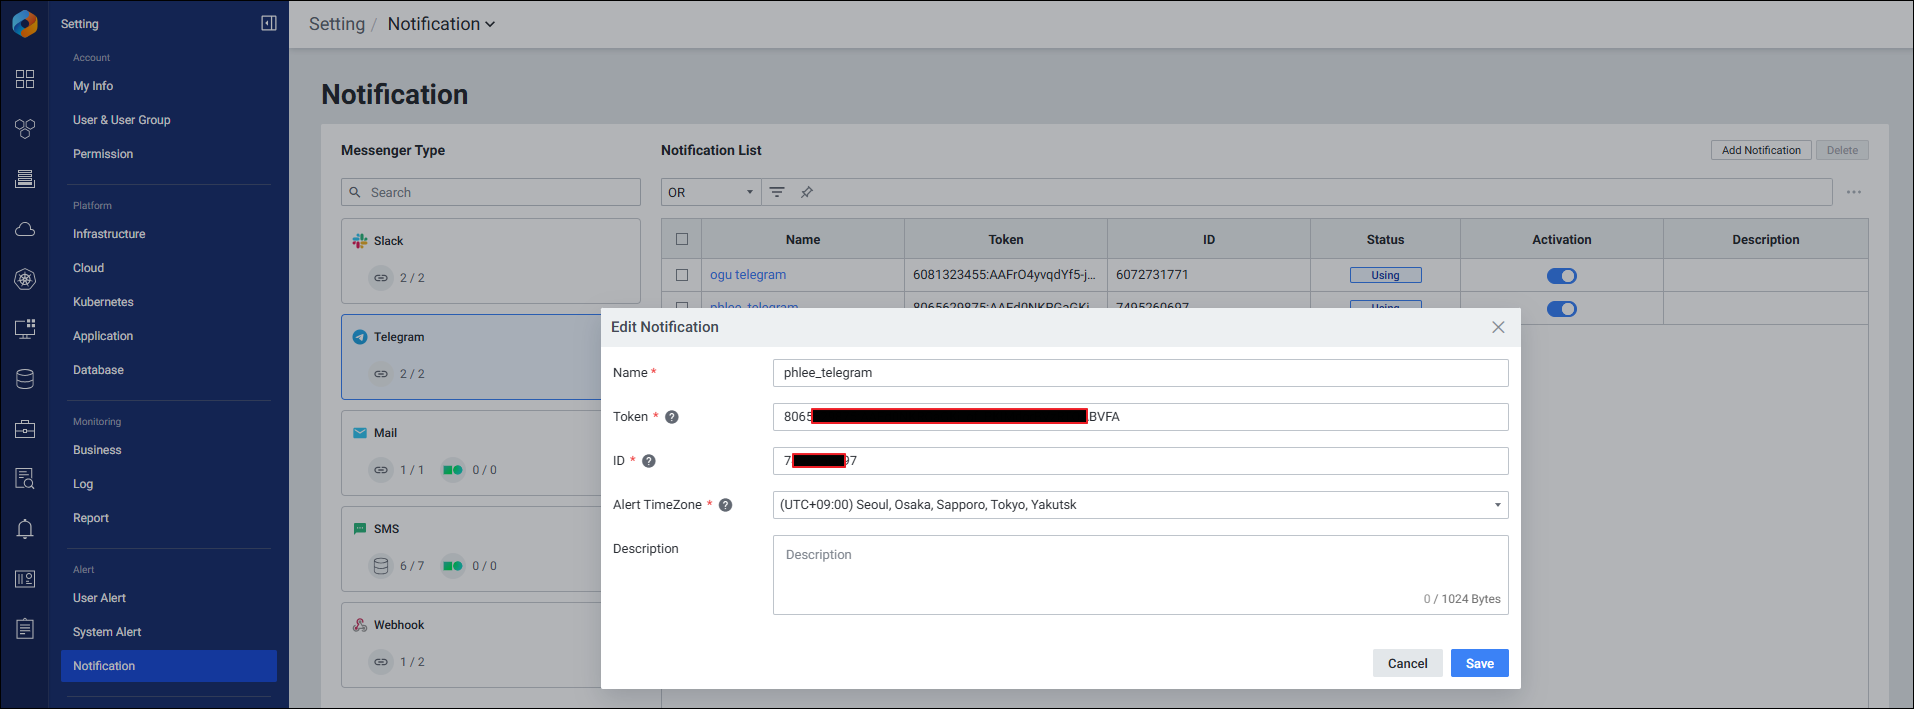
2. Telegram 연동
메뉴 경로: Setting > Alert > Notification > Telegram
사전 준비: Telegram Bot 생성
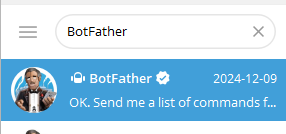
Step 1. Token 값 확인
- Telegram에서 BotFather를 검색하여 채팅방을 생성합니다.
/start→/newbot→{채팅방명}순서로 입력합니다.- 생성 완료 시 Token 값이 표시됩니다.

Step 2. Chat ID 확인
- 생성한 봇을 검색하고 Start 버튼을 눌러 실행합니다.
- 웹 브라우저에서 다음 URL에 접속합니다:
https://api.telegram.org/bot[Token값]/getUpdates - 처음 접속 시
ok: True만 출력되면 채팅방에서/start입력 후 페이지 새로고침합니다. - 표시된 Chat ID를 복사합니다.

exemONE에 Telegram 등록
- Setting > Alert > Notification > Telegram > Add Notification 선택
- 다음 항목 입력:
| 항목 | 설명 |
|---|---|
| Name | Notification 이름 |
| Token | Telegram Bot Token 값 |
| ID | Telegram Chat ID 값 |
| Alert TimeZone | 시간대 설정 |
알람 연동
- 사용자 알람: Rule Setting > Notification > Telegram 탭에서 등록한 Telegram 선택 후 저장
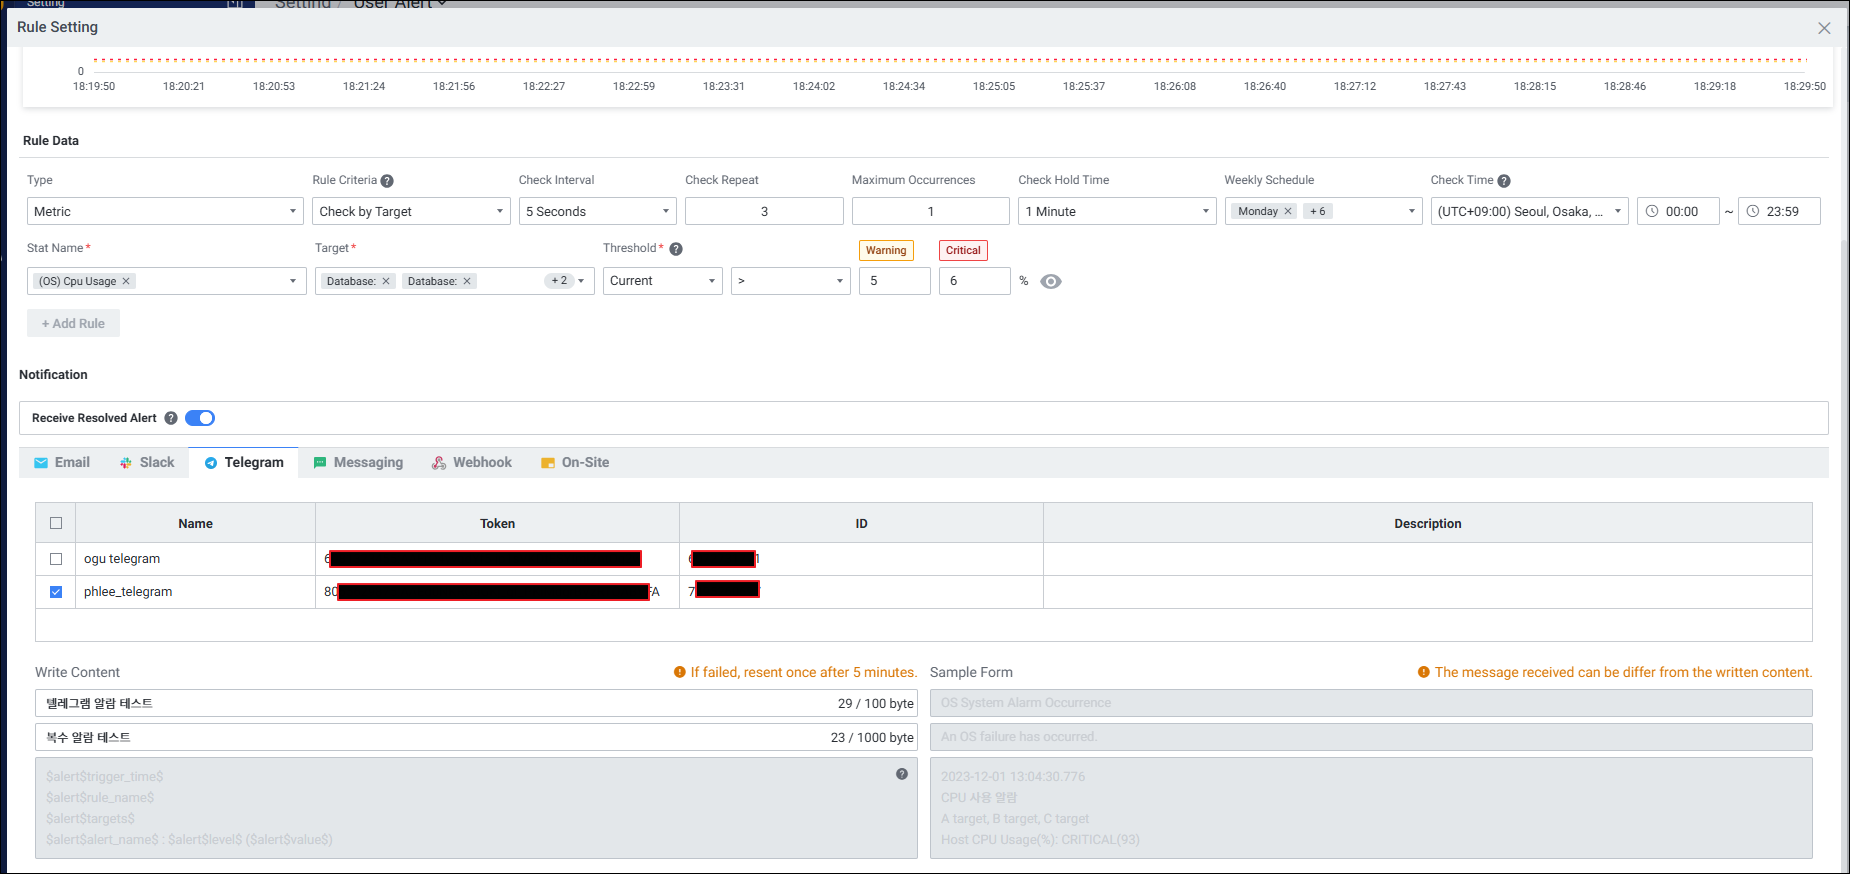
- 시스템 알람: Custom Notification > Telegram 탭에서 등록한 Telegram 선택 후 저장

- Activation 및 Notification 토글을 모두 활성화해야 알람이 발송됩니다.
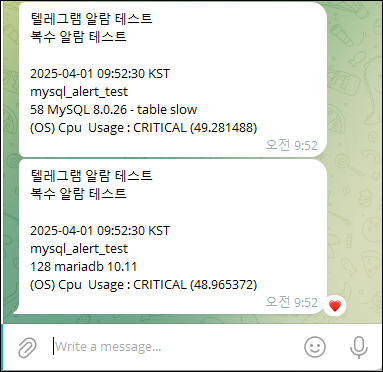
알람 확인
- exemONE:
Alert > Notification History에서 발송 이력 확인 - Telegram: 등록된 채팅방에서 알람 메시지 수신 확인
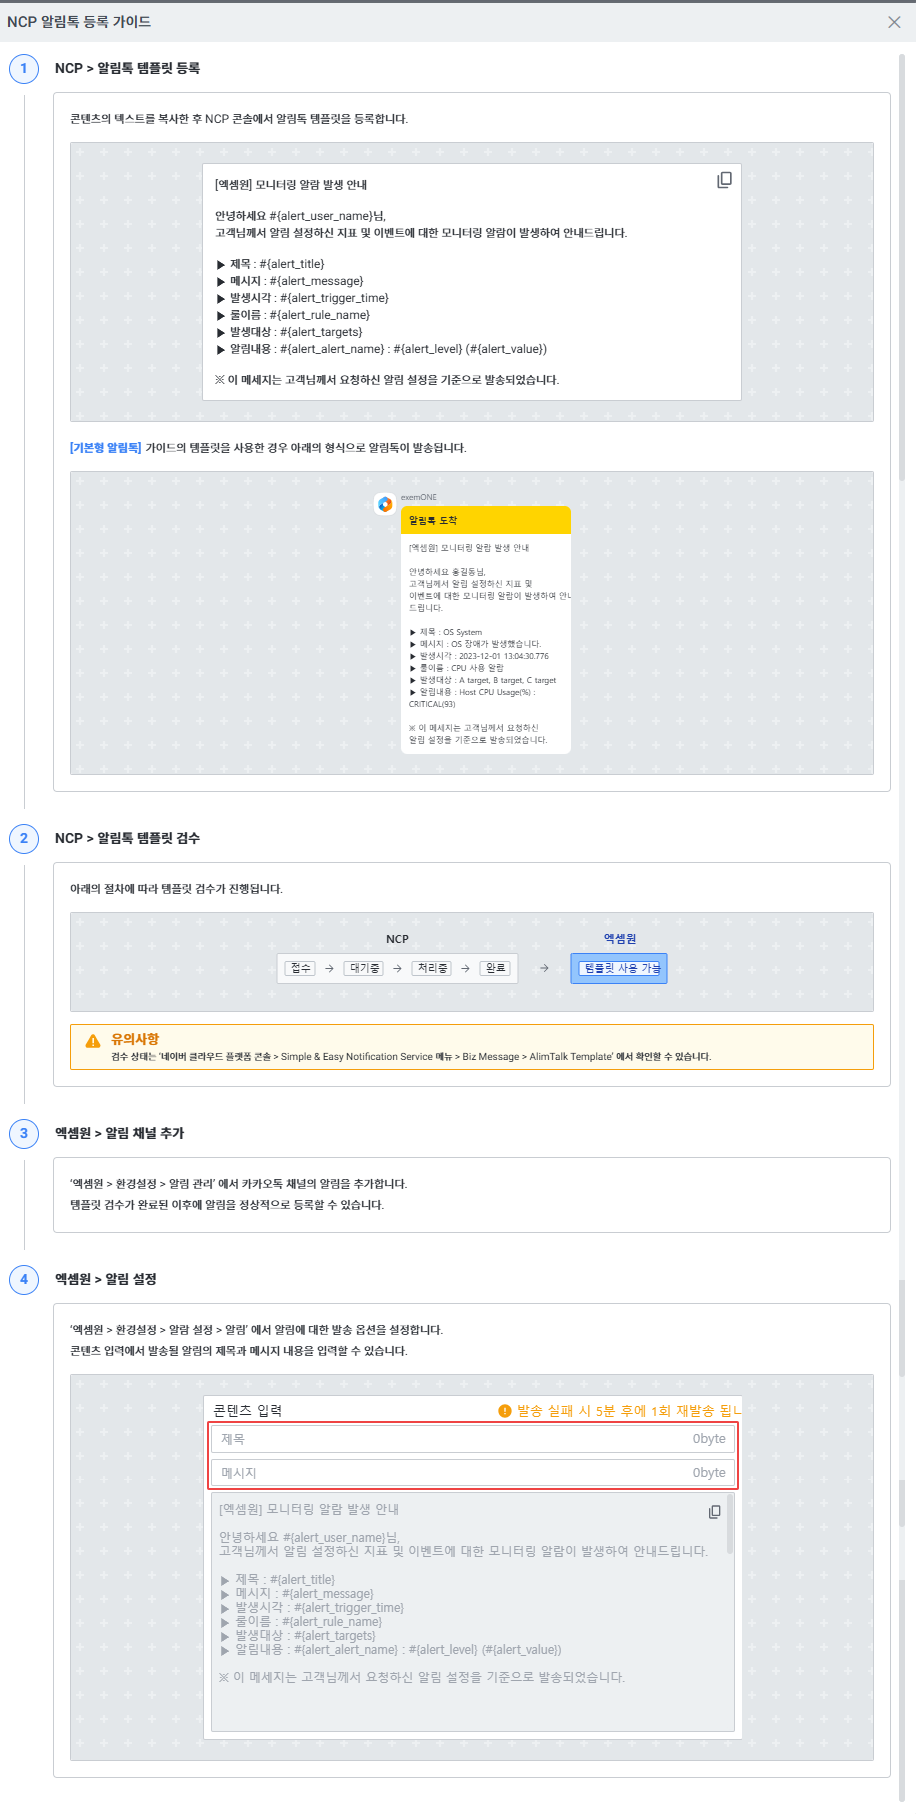
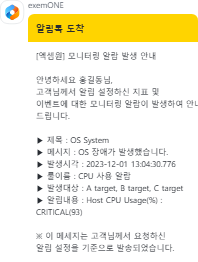
3. KakaoTalk (카카오톡 알림톡) 연동
메뉴 경로: Setting > Alert > Notification > KakaoTalk
카카오톡 알림톡은 Naver Cloud Platform(NCP) 서비스를 통해 연동됩니다.
사전 준비
NCP에서 카카오톡 알림톡(AlimTalk) 등록이 완료되어 있어야 합니다. Add Notification 화면에서 [NCP AlimTalk Guide] 버튼 클릭 시 가이드를 확인할 수 있습니다.
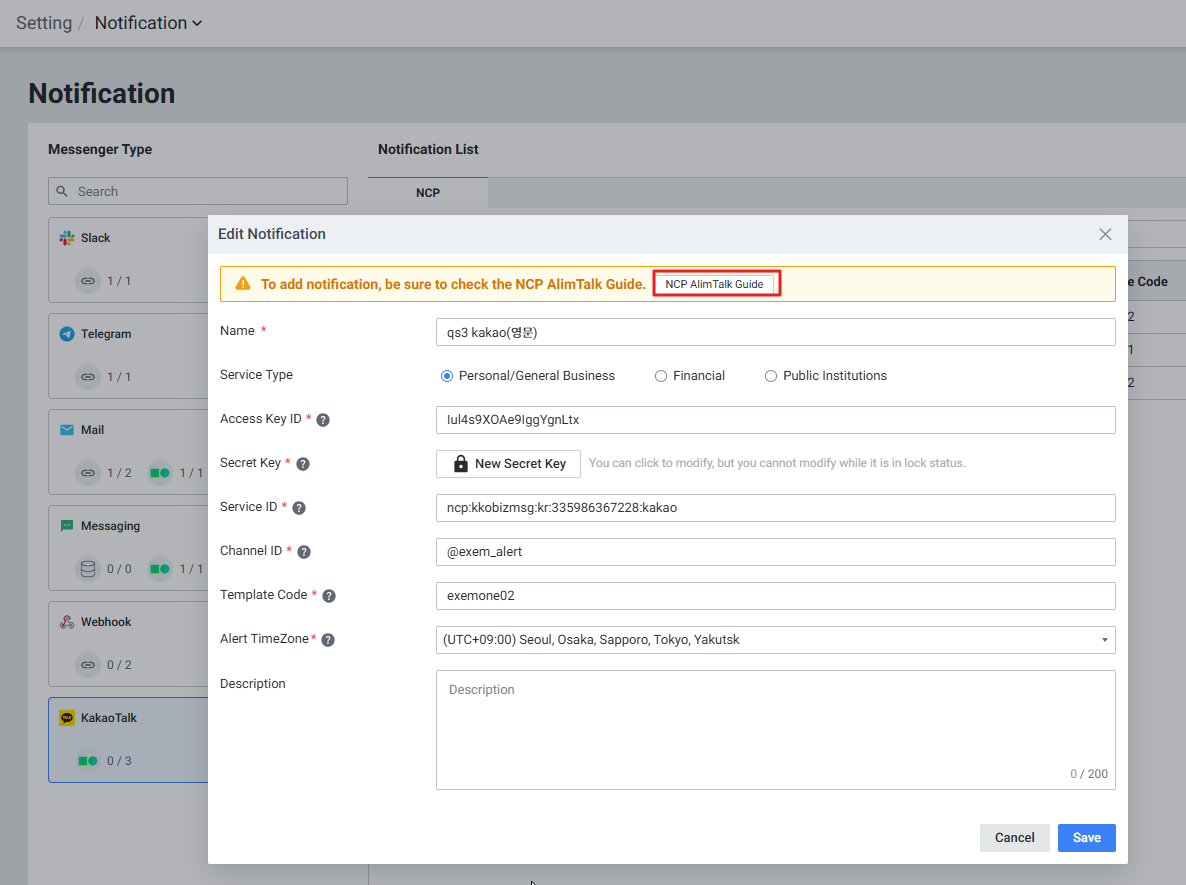
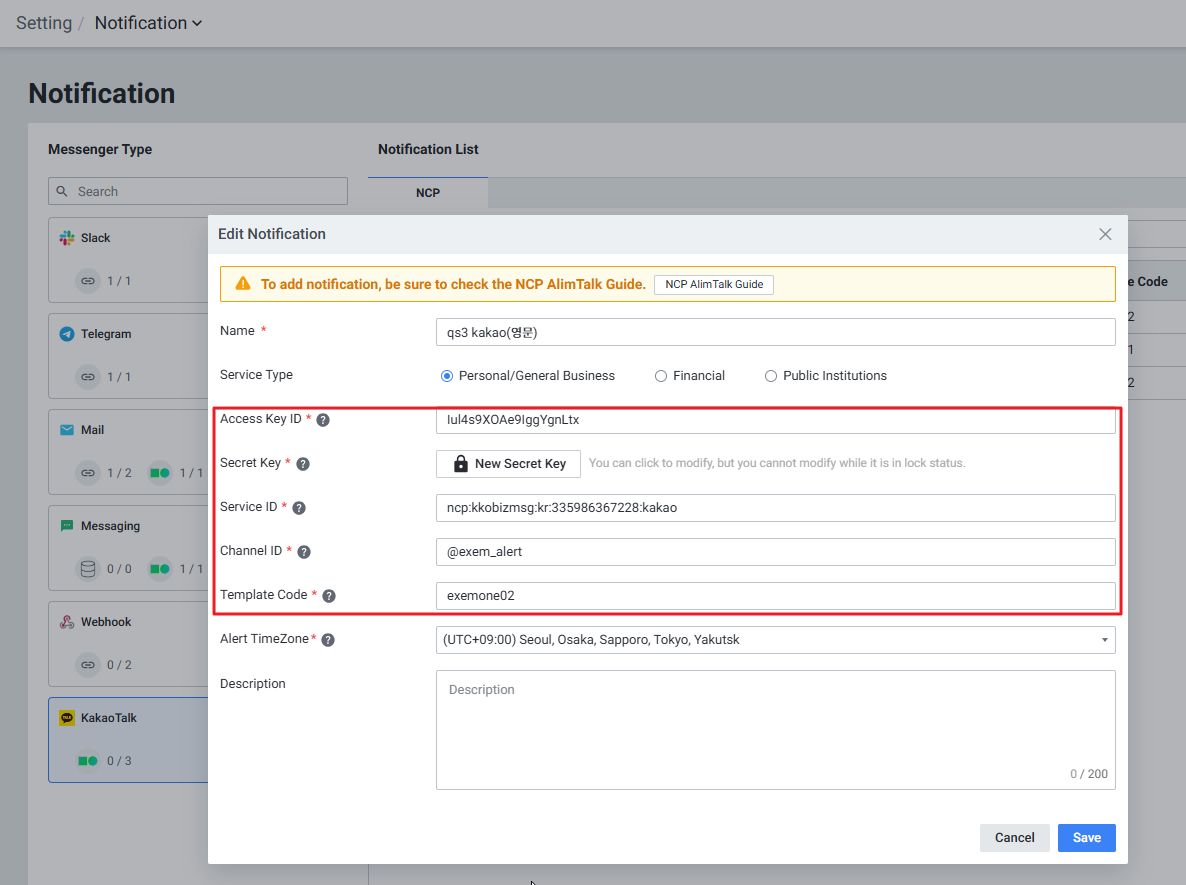
exemONE에 KakaoTalk 등록
- Setting > Alert > Notification > KakaoTalk > Add Notification 선택
- 다음 항목 입력:
| 항목 | 확인 위치 |
|---|---|
| Name | 알림톡 이름 |
| Service Type | 개인/일반 기업용, 금융 클라우드, 공공 기관용 선택 |
| Access Key ID | NCP > 마이페이지 > 계정관리 > 인증키 관리 |
| Secret Key | NCP > 마이페이지 > 계정관리 > 인증키 관리 |
| Service ID | NCP 콘솔 > Simple & Easy Notification Service > 프로젝트 목록 |
| Channel ID | NCP 콘솔 > Biz Message > KakaoTalk Channel |
| Template Code | NCP 콘솔 > Biz Message > AlimTalk Template |
| Alert TimeZone | 시간대 설정 |
알람 연동 및 확인
- 사용자 알람: Rule Setting > Notification > KakaoTalk 탭에서 선택 후 저장
- 시스템 알람: Custom Notification > KakaoTalk 탭에서 선택 후 저장
- Activation 및 Notification 모두 활성화 필수
4. Slack 연동
메뉴 경로: Setting > Alert > Notification > Slack
설정 단계
Step 1. Slack에서 URL 가져오기
- 알림을 수신할 Slack 채널을 생성합니다.
- Slack에서 App이 없다면 새로 생성합니다.
- Incoming Webhooks를 활성화하고, 사전에 만든 채널을 등록합니다.
- 생성된 Webhook URL을 복사합니다.
Step 2. exemONE에 등록
- Setting > Alert > Notification > Slack > Add Notification 선택
- 항목 입력:
| 항목 | 설명 |
|---|---|
| Name | Notification 이름 |
| URL | Slack Incoming Webhook URL |
| Alert TimeZone | 시간대 설정 |

5. Mail (이메일) 연동
메뉴 경로: Setting > Alert > Notification > Mail
SMTP 방식과 NCP 방식 두 가지를 지원합니다.
SMTP 방식
| 항목 | 설명 |
|---|---|
| Host | SMTP 서버 주소 |
| Port | SMTP 서버 포트 |
| SMTP ID(Email) | SMTP 접속 ID |
| SMTP Password | SMTP 접속 비밀번호 |
| From | 발신자 명 |
| TLS INSECURE SKIP VERIFY | 보안 인증서 체인/호스트 이름 확인 생략 여부 |
| Authentication Type | Login / CRAM-MD5 / Plain |

NCP 방식
| 항목 | 설명 |
|---|---|
| Service Type | 서비스 타입 |
| Access Key ID | NCP 인증키 관리에서 확인 |
| Secret Key | NCP 인증키 관리에서 확인 |
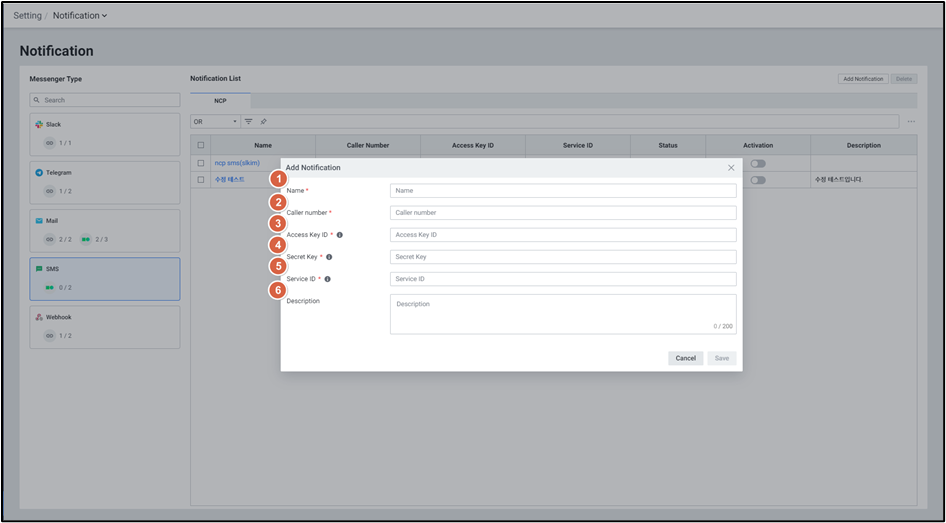
6. SMS 연동
메뉴 경로: Setting > Alert > Notification > SMS
NCP SMS
| 항목 | 확인 위치 |
|---|---|
| Caller Number | 발신 전화번호 |
| Access Key ID | NCP > 마이페이지 > 계정관리 > 인증키 관리 |
| Secret Key | NCP > 마이페이지 > 계정관리 > 인증키 관리 |
| Service ID | NCP 콘솔 > Simple & Easy Notification Service > 프로젝트 목록 |
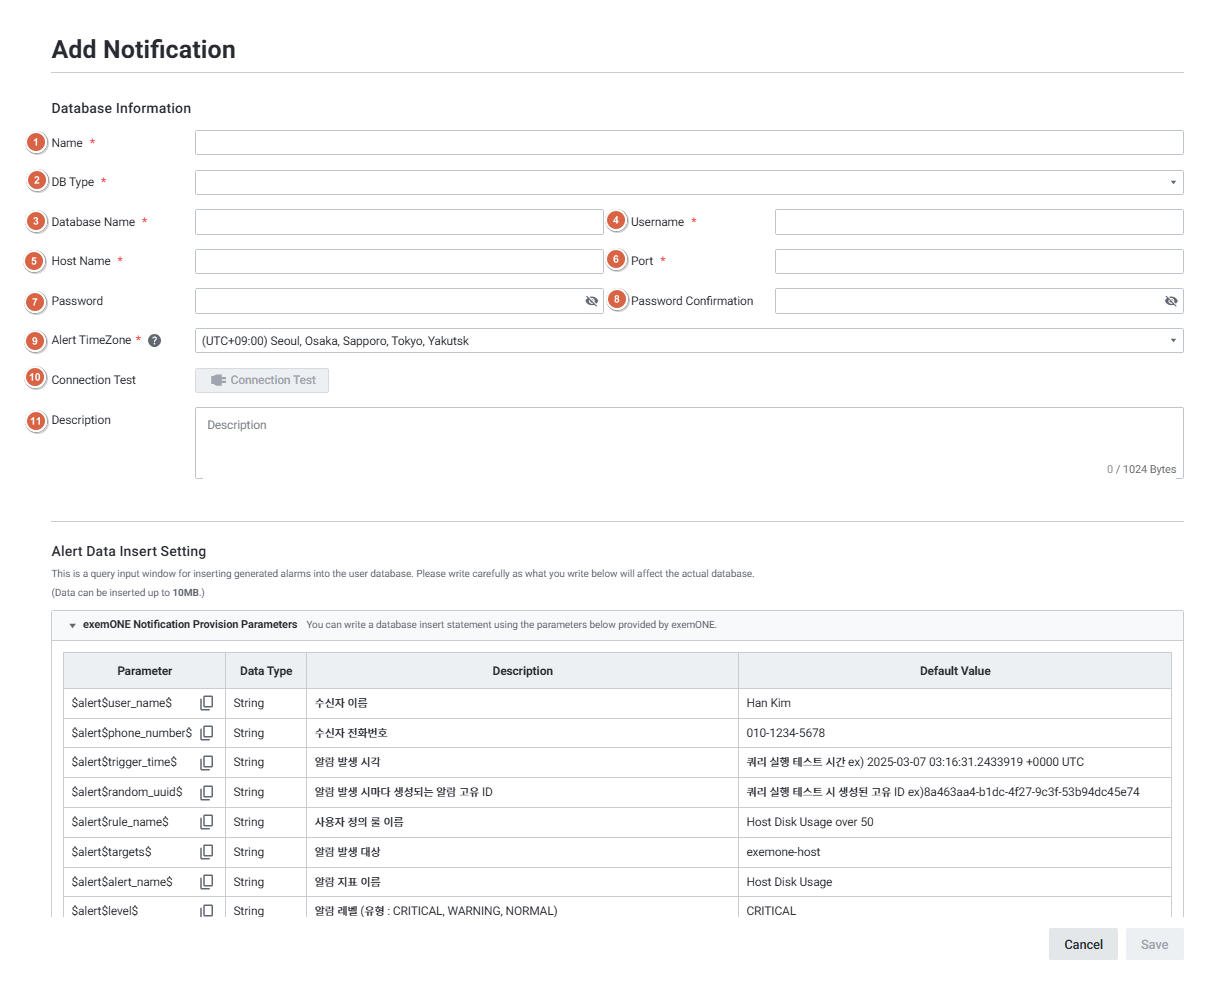
SMS-DB
외부 DB에 알람 정보를 INSERT하는 방식으로, Oracle/MySQL/PostgreSQL/SQL Server/Altibase를 지원합니다. DB 연결 정보 입력 후 Connection Test → 쿼리 작성 → Test Query Execution으로 검증합니다.
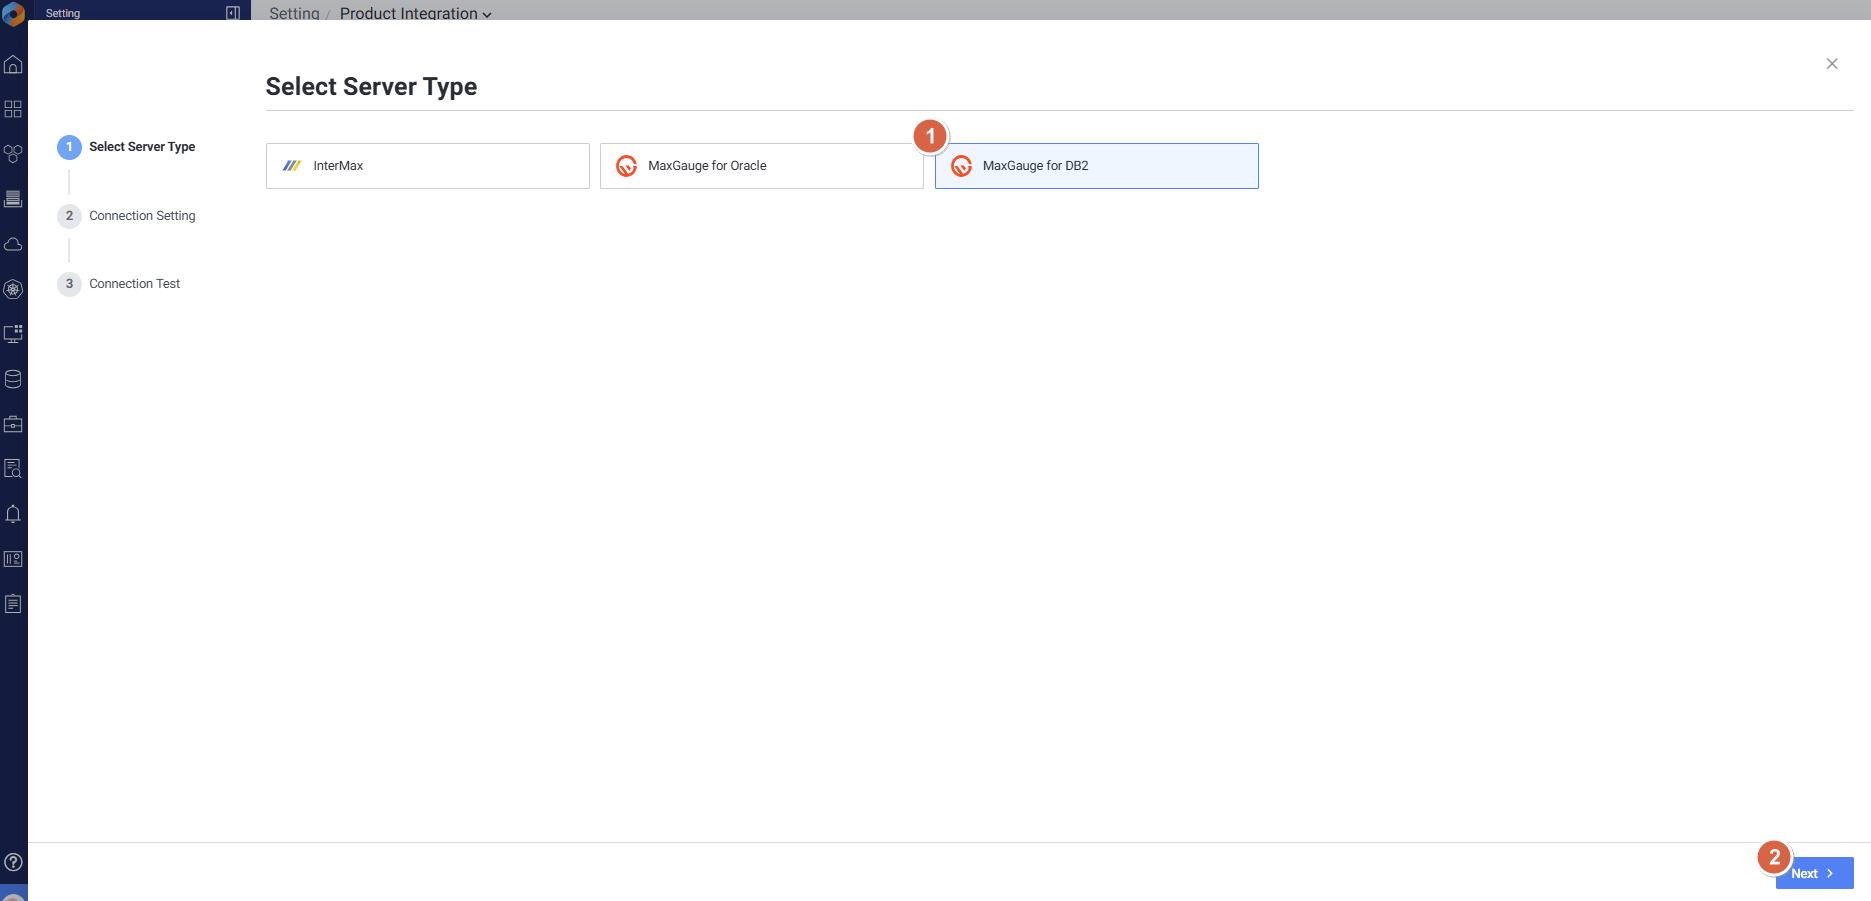
7. 타 제품 연동 (Product Integration)
메뉴 경로: Setting > Platform > Product Integration
exemONE은 엑셈의 타 제품 데이터를 API로 호출하여 대시보드에서 모니터링할 수 있습니다.
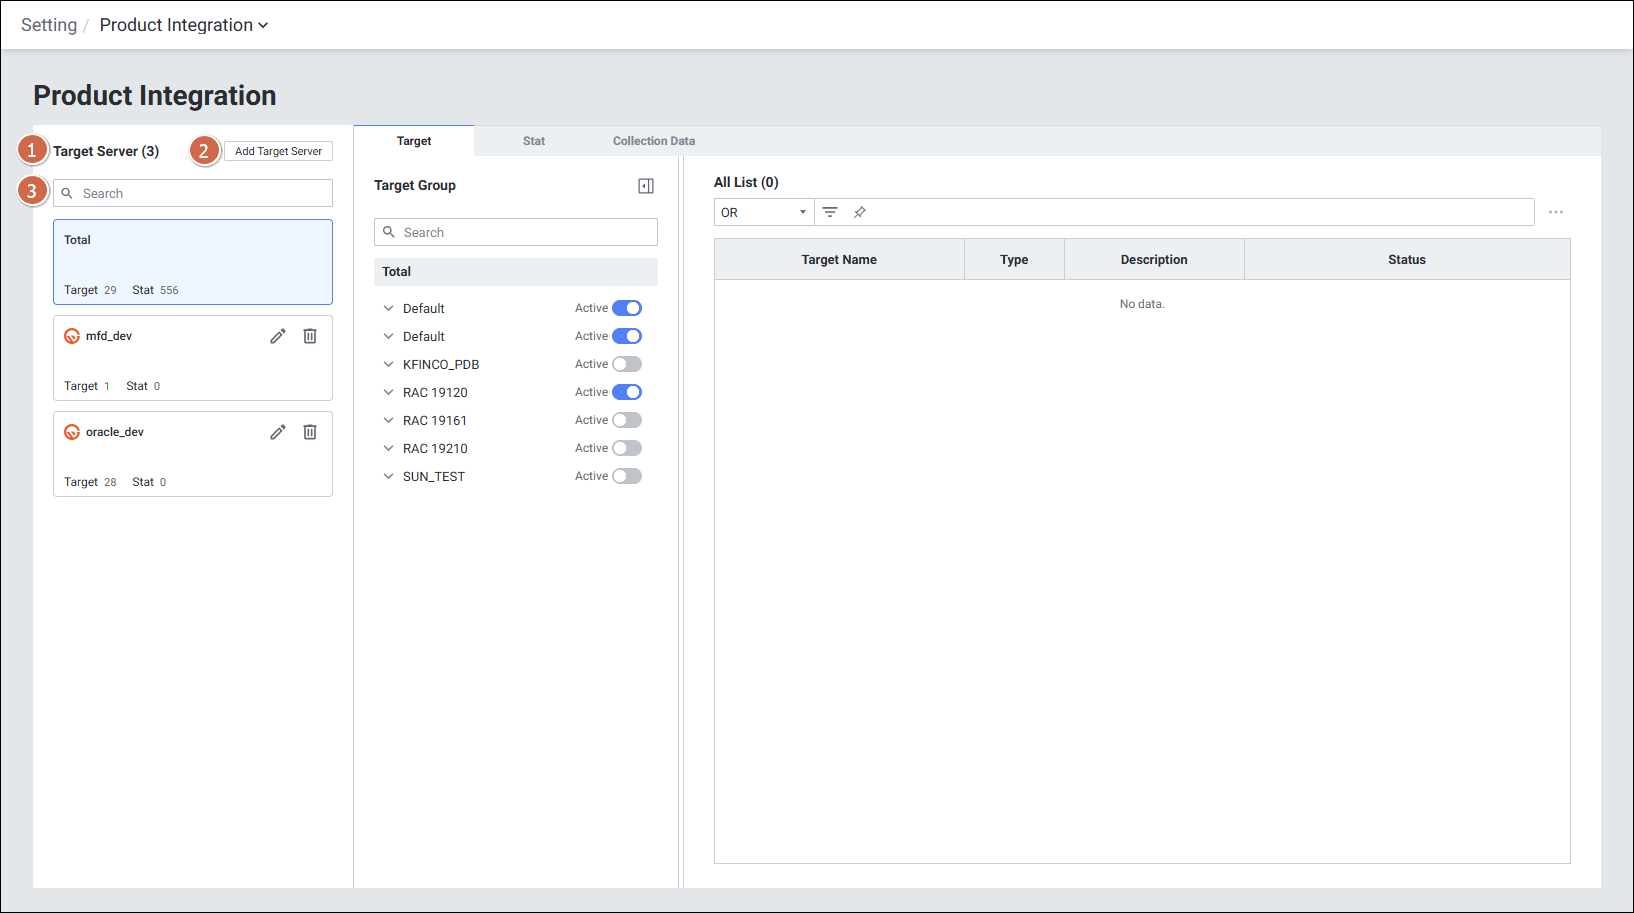
지원 제품
- InterMax
- MaxGauge for Oracle
- MaxGauge for DB2
공통 사전 조건
- exemone-api-agent가 설치되어 있어야 합니다.
InterMax 연계
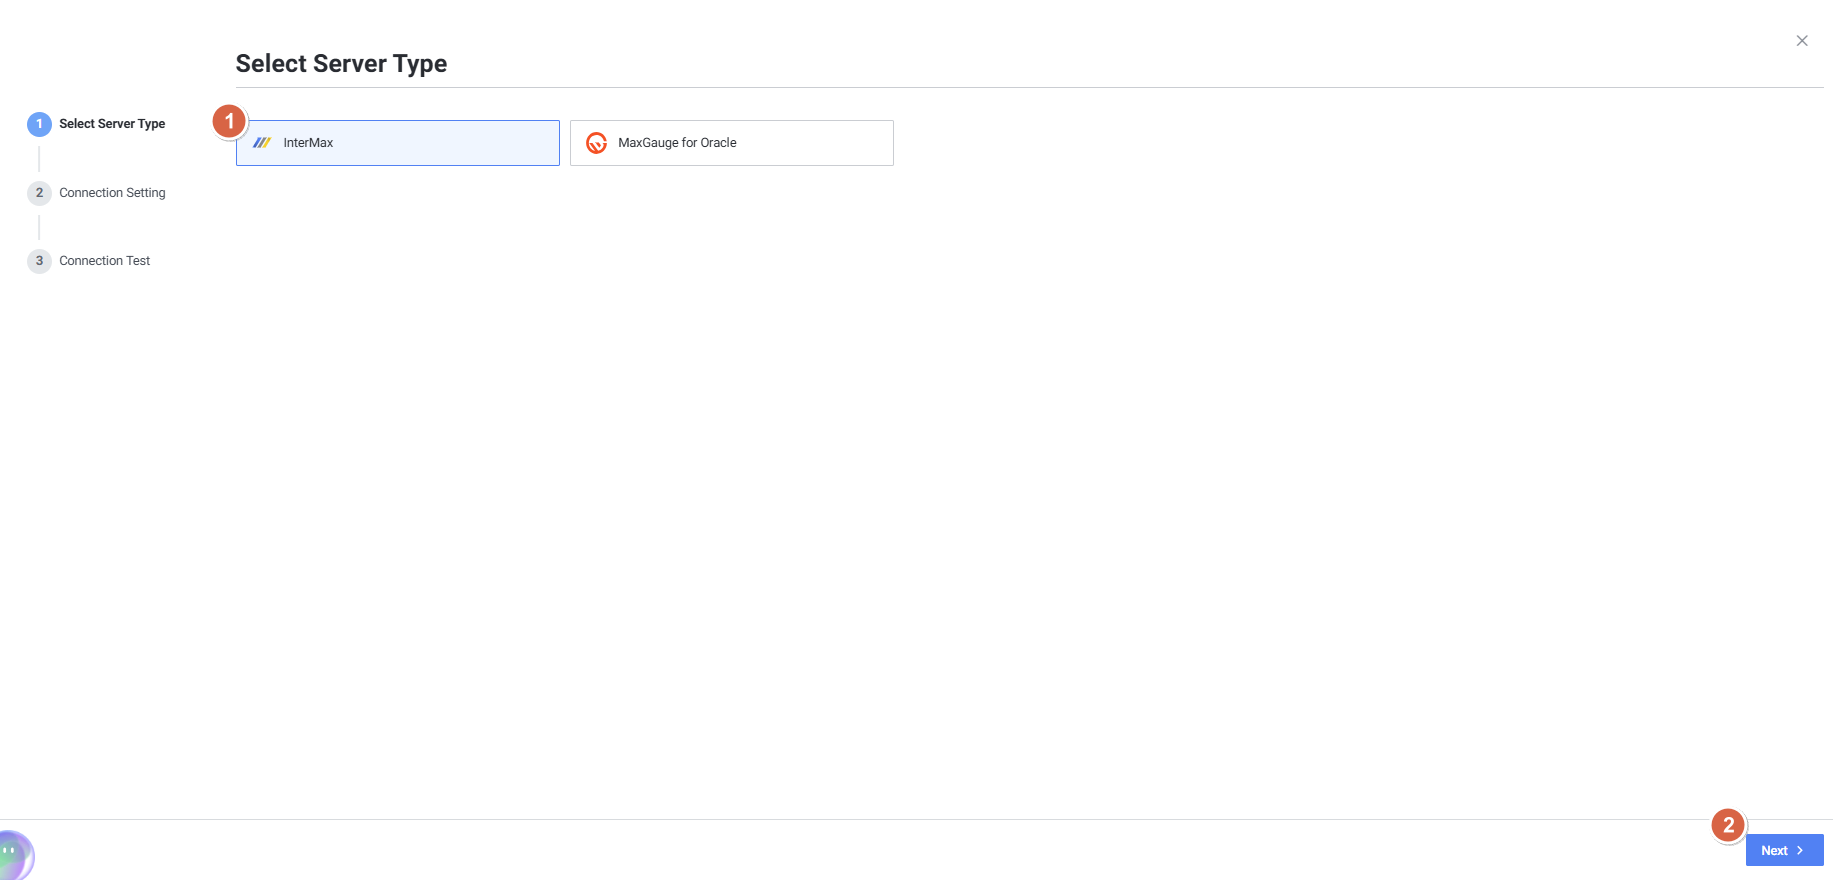
Setting > Product Integration > Add Target Server선택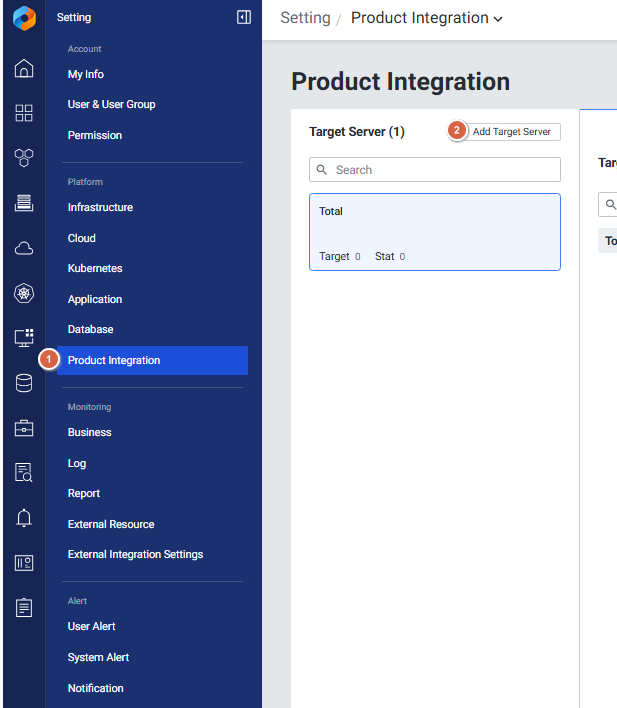
- Server Type을 InterMax 선택 후 Next
- Connection Setting에서 InterMax 정보 입력
- URL: InterMax 포트까지만 작성 (예:
http://10.10.10.10:8080/) - HTTP Auth: API Key 선택, Key:
Authorization, Value: InterMax에서 설정한 토큰 값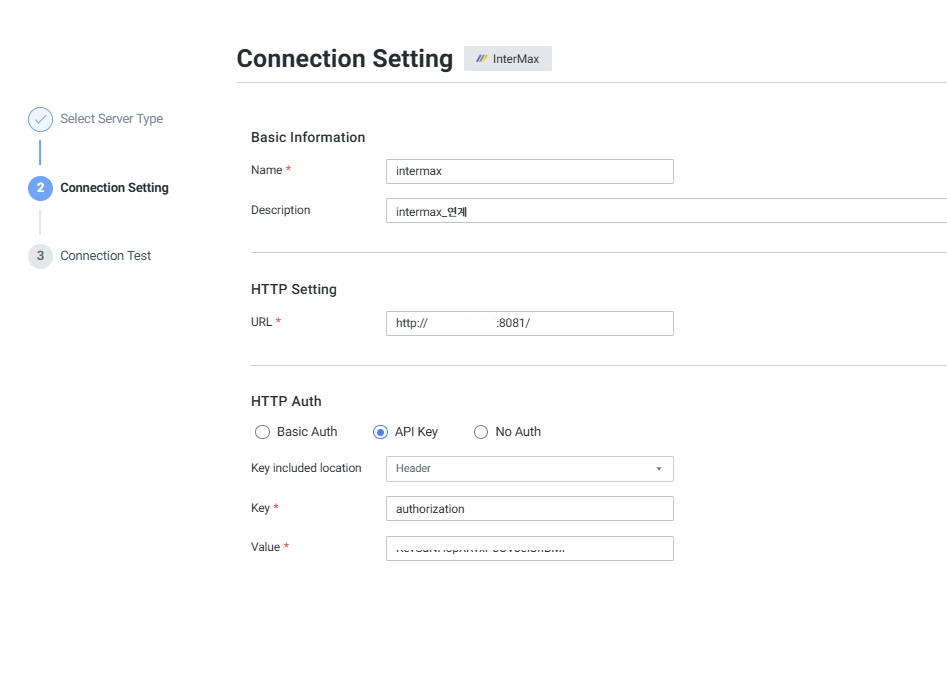
- URL: InterMax 포트까지만 작성 (예:
- Connection Test 성공 시 Save 버튼 활성화
MaxGauge for Oracle 연계
Setting > Product Integration > Add Target Server선택- Server Type을 MaxGauge for Oracle 선택 후 Next
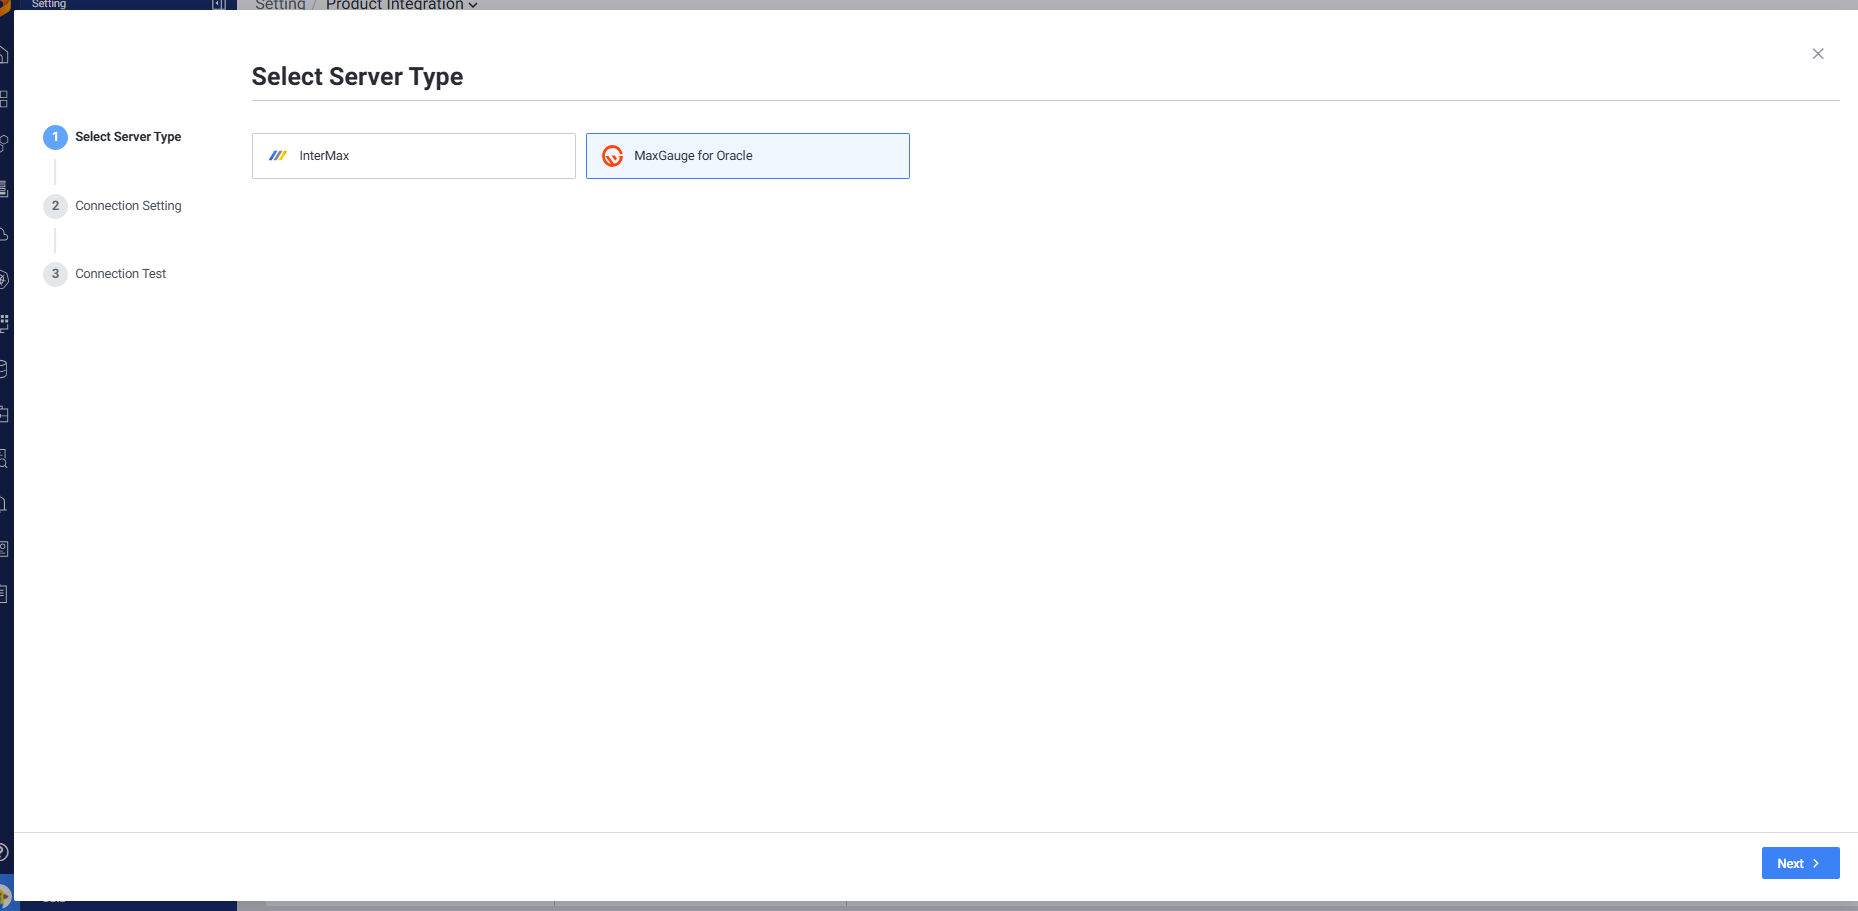
- URL은 MaxGauge 포트까지만 작성, HTTP Auth 인증은 필요에 따라 선택
- Connection Test 후 Save
- 모니터링 대상 선택 및 57개 지표 확인 가능
MaxGauge for DB2 연계
InterMax/MFO와 동일한 흐름으로, Server Type을 MaxGauge for DB2로 선택하여 연계합니다.
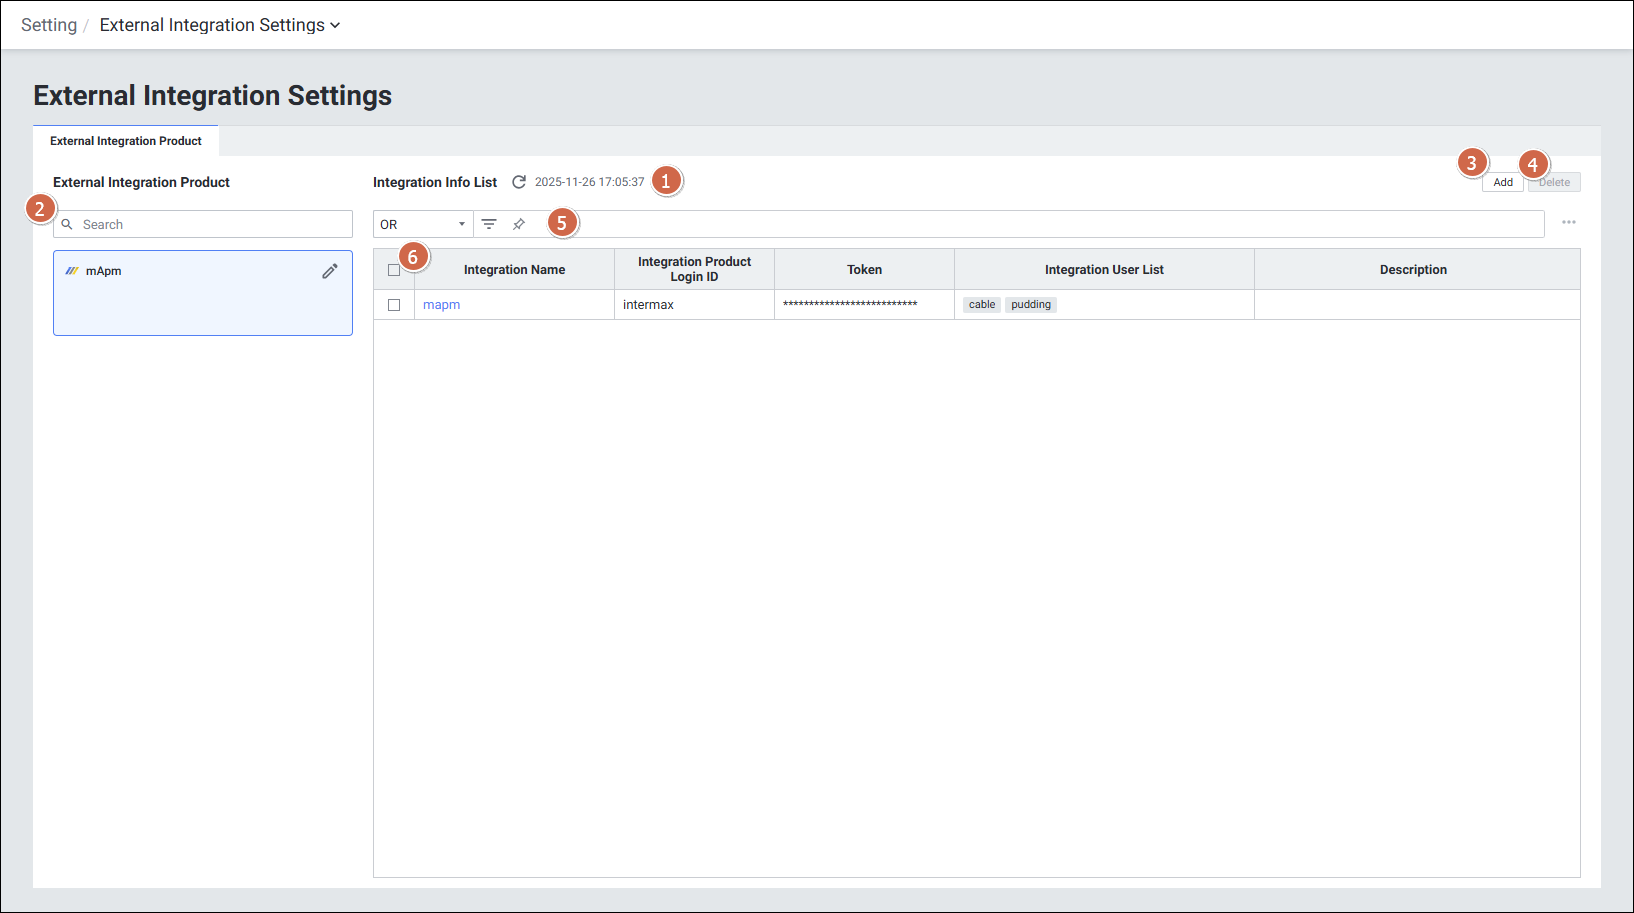
8. 외부 연계 설정 (External Integration Settings) - mApm 연계
메뉴 경로: Setting > Monitoring > External Integration Settings
mApm(InterMax for Mobile) 제품과 양방향 연계를 지원합니다.
사전 조건
- exemONE v3.0.507.0 이상
- exem-java-agent v3.0.24.7 이상
- Java 옵션:
RESP_HEADER_TID=true설정 필요 - mApm 버전: InterMax_For_Mobile 5.4.4.10
설정 단계
exemONE → mApm 연계:
- mApm에서 Token을 발급받습니다.
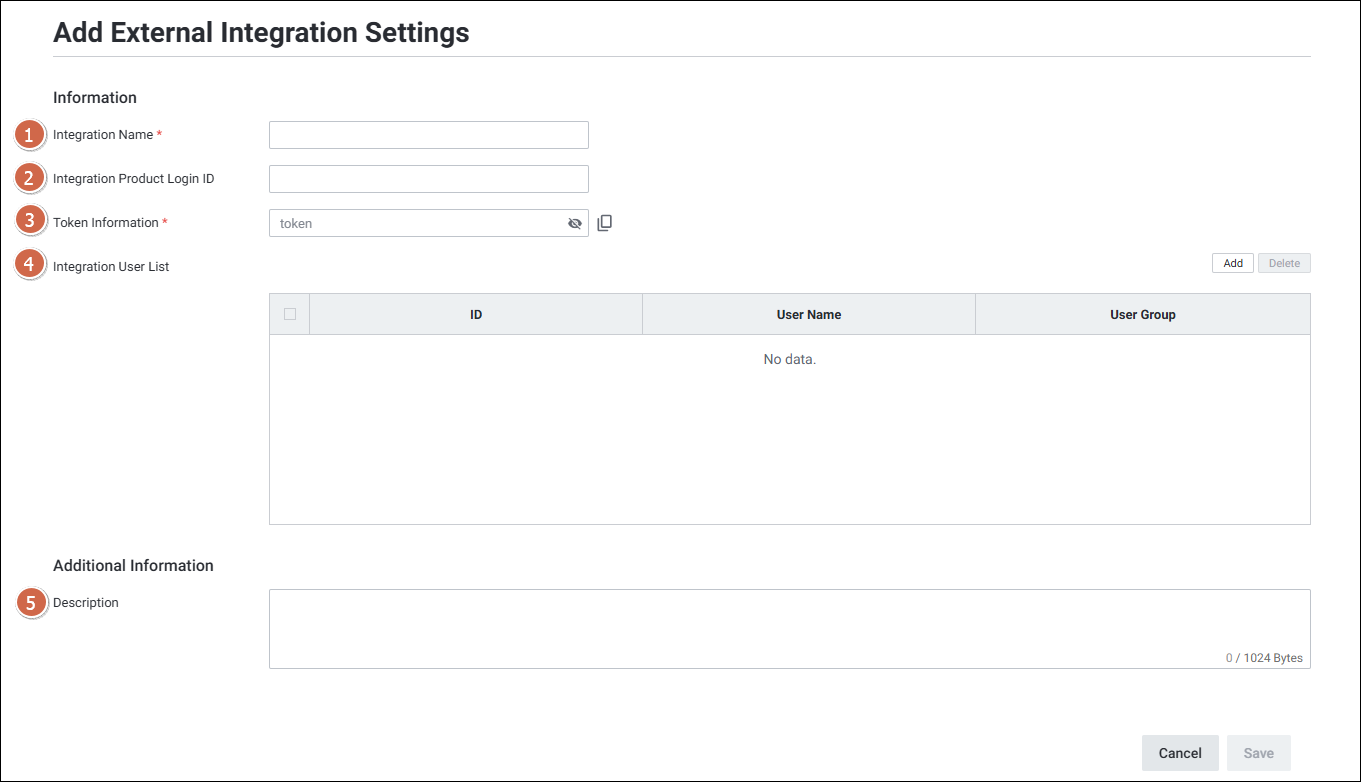
Setting > Monitoring > External Integration Settings > Add버튼 클릭- Integration Name, Product Login ID, Token 정보 등을 입력합니다.
mApm → exemONE 연계:
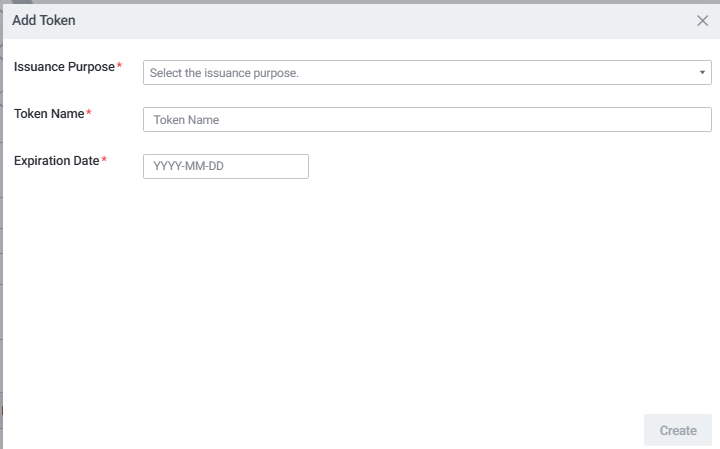
Setting > Account > My Info > Tokens > Add Token클릭- Product Integration 선택, Token Name 설정 및 사용 기한 입력
- 생성된 Token을 복사하여 mApm 환경에 등록
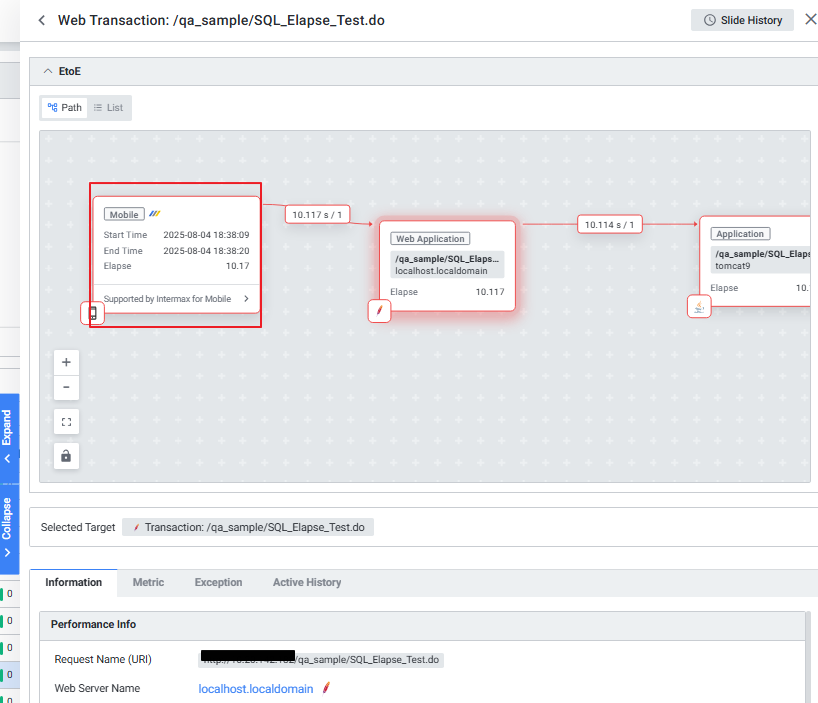
연결 완료 시 Web Transaction의 path에서 Mobile 데이터 확인이 가능하며, "Supported by Intermax for Mobile"을 선택하면 mApm 제품으로 이동합니다.
추가 주의사항
- 모든 Notification은 Activation(활성화)이 ON이어야 알람이 발송됩니다.
- Group Notification과 Custom Notification(Isolated Sending) 설정에 따라 그룹/개별 알림 수신을 제어할 수 있습니다.
- Webhook의 Alert Parameter는
$alert$파라미터명$형식이며, 소문자를 사용합니다. - 제품 연계 시 Connection Test 실패하면
exemone-api-agent로그를 먼저 확인합니다.
관련 문서:
- Notification 메뉴 개요
- Webhook 설정
- Telegram 설정
- KakaoTalk 설정
- Slack 설정
- Mail 설정
- SMS NCP 설정
- SMS-DB 설정
- Telegram 연동 가이드
- KakaoTalk 연동 가이드
- Webhook TLS 적용
- Webhook Body 암호화
- Alert 유형별 Parameter 설정
- 사용자 선택 및 사용자별 발송 가이드
- Group Alert 알람 수신 설정
- Product Integration 설정
- InterMax 연계 가이드
- MaxGauge for Oracle 연계 가이드
- MaxGauge for DB2 연계 가이드
- External Integration Settings
- mApm 연계 가이드