Alert (알람)
검색된 문서들을 기반으로 exemONE의 Alert 기능 전체를 상세히 설명드리겠습니다.
exemONE Alert(알람) 기능 상세 설명
exemONE의 Alert 기능은 크게 User Alert(사용자 알람), System Alert(시스템 알람), External Alert(외부 알람) 으로 구성되며, 발생된 알람을 Webhook, Telegram, KakaoTalk, Email, SMS 등 다양한 채널로 수신할 수 있습니다.
1. Alert 유형 개요
1-1. User Alert (사용자 알람)
사용자가 직접 알람 규칙(Rule)을 생성하는 알람입니다. 아래 4가지 타입을 지원합니다.
| 타입 | 설명 |
|---|---|
| Metric | 수집 지표(메트릭) 기반 임계치 알람 |
| Event | 이벤트 발생 기반 알람 (Process Down, K8s Pod 이벤트 등) |
| Event Statistics | 하루 동안 발생된 Logging 카운트 기반 알람 |
| Table | 테이블 유형 데이터(예: Oracle Tablespace, MySQL Parameter Change Log 등)의 특정 컬럼 기반 알람 |
1-2. System Alert (시스템 알람)
시스템에서 자동으로 설정되는 고정 알람입니다. 대상별로 disconnected, Unknown, dbDisconnected, lazyQueryExecution, agentDisconnected 등의 상태를 감지합니다.
1-3. External Alert (외부 알람)
메뉴 경로: Setting > Alert > External Alert
서버에 저장되지 않는 외부 데이터(Prometheus, Elasticsearch 등)로 알람을 설정하는 화면입니다.
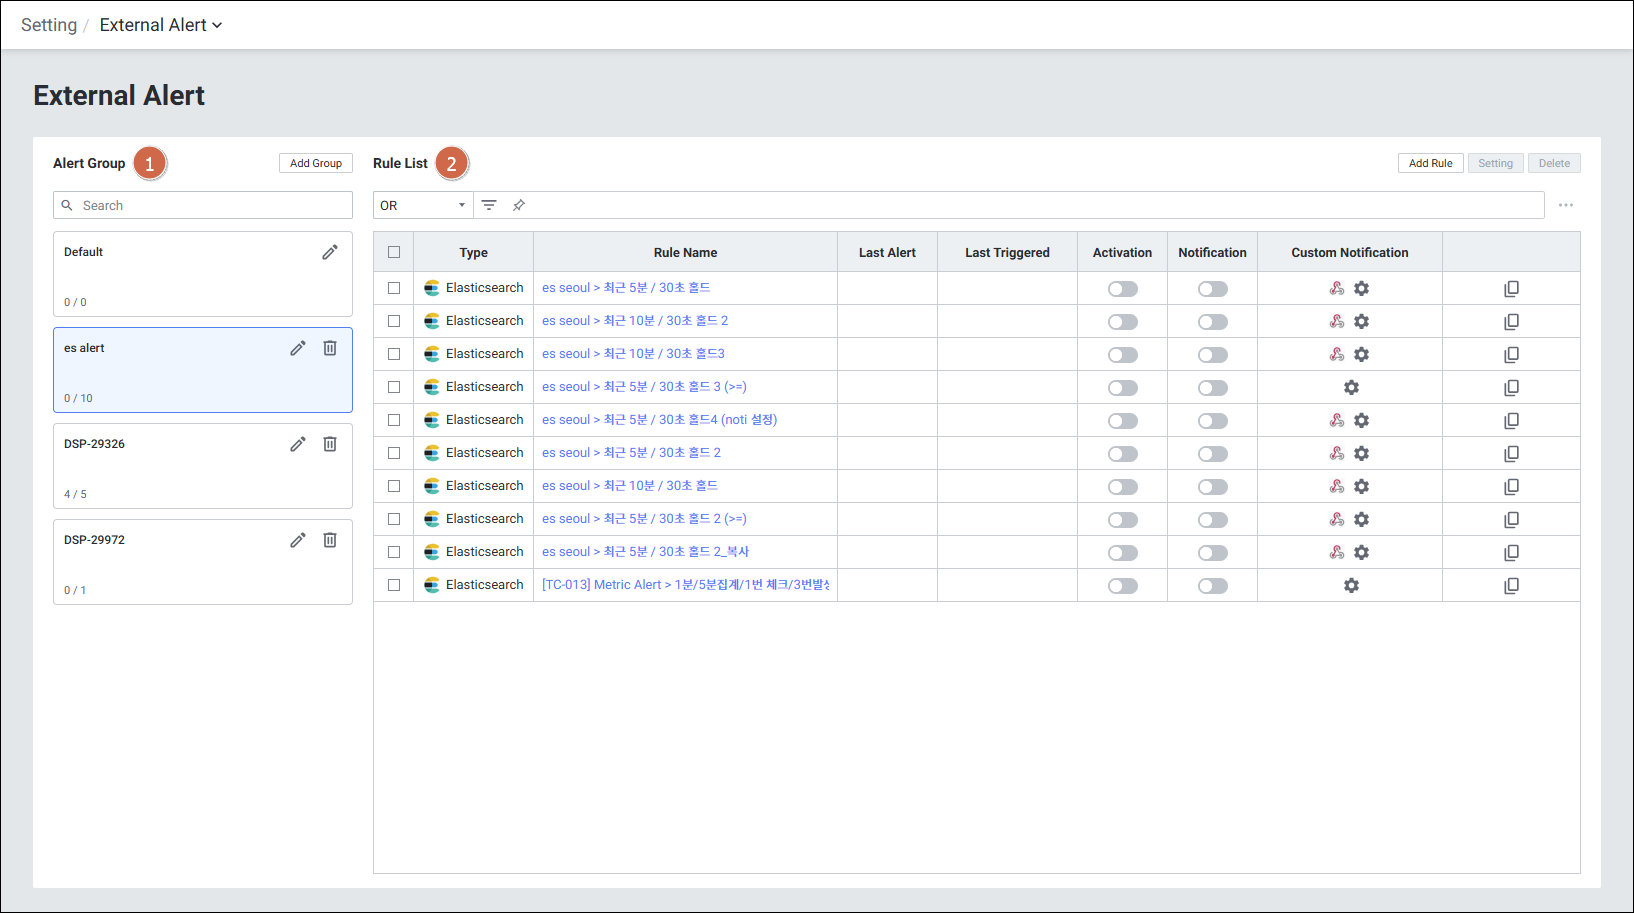
| 순번 | 항목 | 내용 |
|---|---|---|
| 1 | Alert Group | 외부 알람 그룹 목록 표시 |
| 2 | Rule List | 룰 목록 표시 |
| - | Add Rule | Prometheus, Elasticsearch 룰 데이터 설정 |
| - | Activation | 알람 활성 여부 설정 |
| - | Notification | 알림 수신 여부 설정 |
| - | Custom Notification | 개별 타겟 알림 설정 |
2. User Alert 알람 규칙 설정
2-1. Rule Alert List (알람 목록)
메뉴 경로: Setting > Alert > User Alert > Rule List
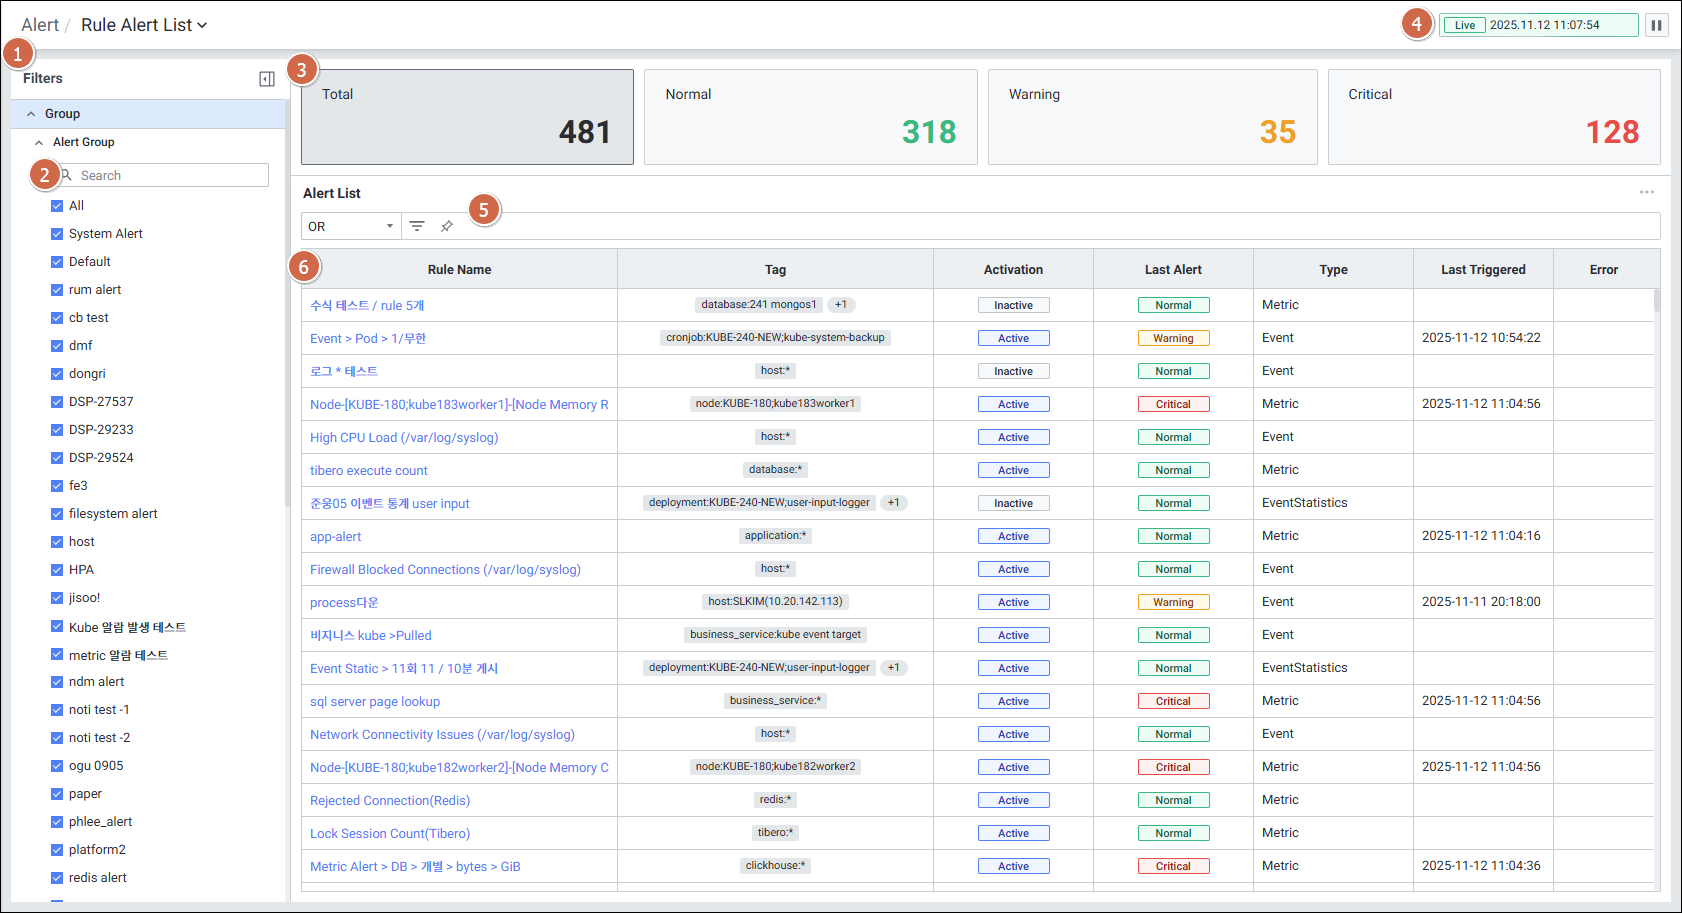
| 순번 | 항목 | 내용 |
|---|---|---|
| 1 | Filters | Alert 그룹명 선택 필터 |
| 2 | Search | Alert 그룹 검색 |
| 3 | Card | - Total: 전체 Alert 수 - Normal: Last Alert가 Normal인 수 - Warning: Last Alert가 Warning인 수 - Critical: Last Alert가 Critical인 수 |
| 4 | Global Time | 실시간 모니터링 데이터 확인 |
| 5 | Filter | Or/And 조건으로 Notification 목록 필터 |
| 6 | Grid | 알람 목록 (Rule Name, Tag, Activation, Last Alert, Type, Last Triggered, Error 포함) |
2-2. Rule Setting (Metric 타입) - 메트릭 기반 알람 규칙 설정
메뉴 경로: Setting > Alert > User Alert > Create Rule (Type: Metric)
주요 설정 항목
| 항목 | 내용 |
|---|---|
| Rule Name | 알람 룰 이름 입력 |
| Type | Metric 선택 |
| Check Interval | 알람 체크 주기 (1분 이상 설정 가능, 부하 최소화 목적) |
| Check Hold Time | 임계 조건 유지 시간 |
| Warning Threshold | Warning 임계치 설정 |
| Critical Threshold | Critical 임계치 설정 |
| Weekly Schedule | 알람 발생 스케줄 지정 (지정된 스케줄 내에서만 알람 체크) |
| Check Time | 알람 발생 시간 지정 (지정된 시간 내에서만 알람 발생) |
| Target | 알람 대상 타겟 설정 |
2-3. Rule Setting (Event 타입) - 이벤트 기반 알람 규칙 설정
메뉴 경로: Setting > Alert > User Alert > Create Rule (Type: Event)
대표 이벤트 유형: Process Down Detection
Host 타겟에서 구동 중인 프로세스 종료 시 알람이 발생됩니다.
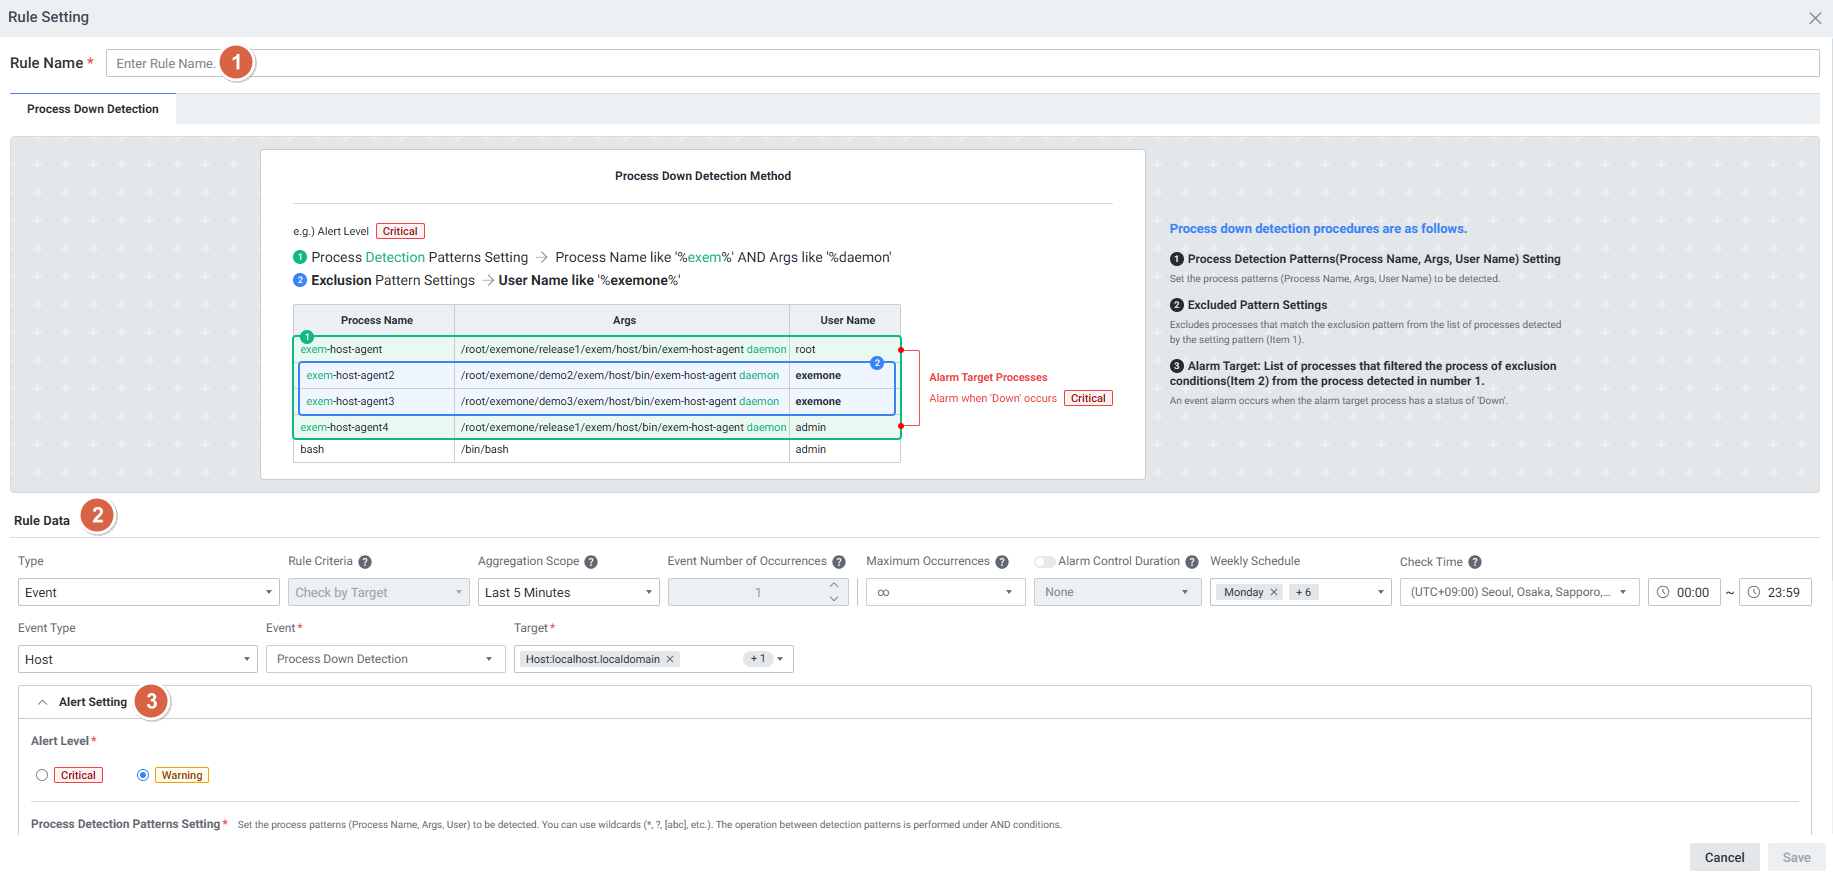
Rule Data 항목
| 순번 | 항목 | 내용 |
|---|---|---|
| 1 | Aggregation Scope | 알람 발생 집계 범위 설정 (예: 5분 설정 시 최근 5분 이벤트를 집계하여 알람 발생) |
| 2 | Maximum Occurrences | 알람 최대 발생 횟수 입력 (기본값: 10, 최소: 1, 최대: 100). 최대 발생 횟수 초과 시 추가 알람 미발생 |
| 3 | Alarm Control Duration | Maximum Occurrences가 ∞가 아닐 경우 활성화. 알람 체크 중지 시간 선택 (0초 ~ 1일) |
| - | - Alert Stop | 알람 체크 중지 시간 동안 Normal 알람 발생 시에도 알람 체크 중지 |
| - | - Alert Clear | 알람 체크 중지 시간 동안 Normal 알람 발생 시 알람 체크 중지 해제 |
| 4 | Weekly Schedule | 알람 발생 스케줄 지정 |
| 5 | Check Time | 알람 발생 시간 지정 |
| 6 | Target | Target Setting 팝업에서 타겟 설정 |
2-4. Rule Setting (Event Statistics 타입) - 로그 이벤트 통계 알람
메뉴 경로: Setting > Alert > User Alert > Create Rule (Type: Event Statistics)
하루 동안 발생된 Logging 카운트에 대한 알람입니다.
- 발생 조건: 알람 생성 시점부터 Logging 카운트 적용
- 사전 조건: 사전에 Logging 등록 및 활성화 필요
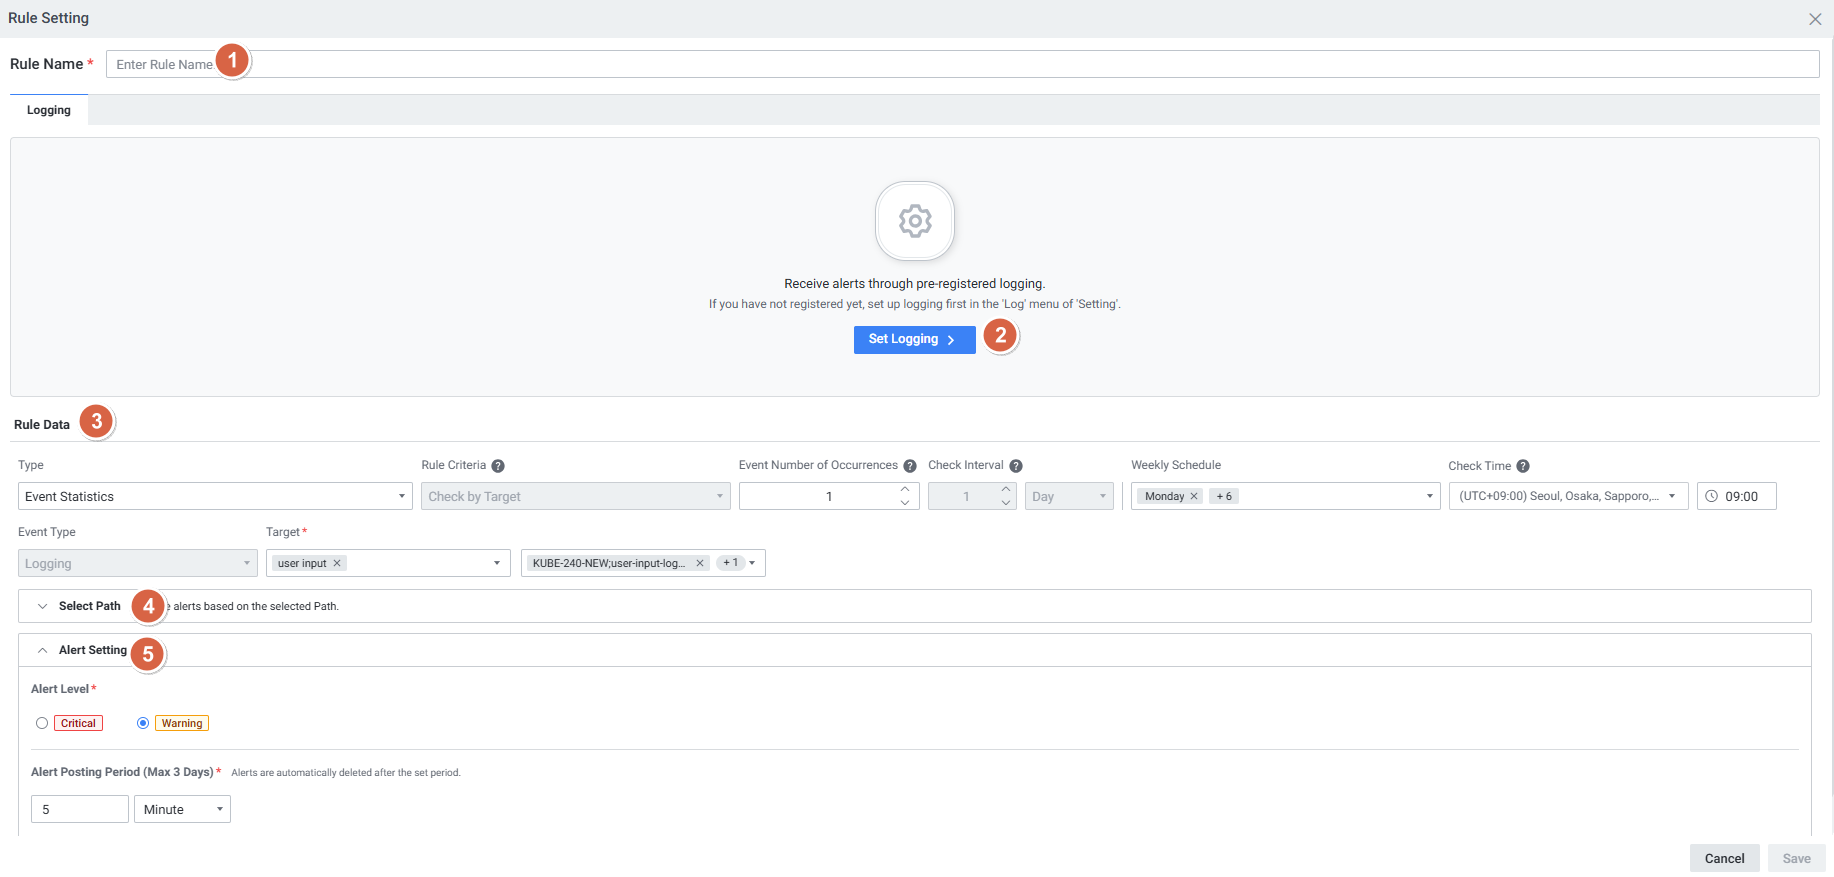
| 순번 | 항목 | 내용 |
|---|---|---|
| 1 | Event Number of Occurrences | 임계 값 체크 횟수 (기본값: 3, 최소: 1, 최대: 100). 임계값이 체크 반복 횟수에 도달하면 알람 발생 |
| 2 | Weekly Schedule | 알람 발생 스케줄 지정 |
| 3 | Check Time | 알람 발생 시간 지정 |
| 4 | Target | 타겟 설정 |
2-5. Rule Setting (Table 타입) - 테이블 알람
메뉴 경로: Setting > Alert > User Alert > Create Rule (Type: Table)
테이블 유형 데이터에서 특정 컬럼을 대상으로 알람을 발생시킵니다.
지원 지표:
- MySQL Parameter Change Log
- MySQL Tablespace
- Oracle Parameter Change Log
- Oracle Tablespace
- PostgreSQL Parameter Change Log
- pg_default Tablespace Size / pg_global Tablespace Size
- infra_filesystem_stat
설정 시 필수 조건:
- Check Interval: 1분 이상부터 설정 가능 (부하 발생 최소화 목적)
- Check Hold Time: 최근 10분 데이터를 대상으로 알람 발생하므로 10분 이상 설정 필수
- Parameter Change Log 의 경우: Check Interval 1시간, Check Hold Time 0초 설정

Table 알람 등록 단계:
Setting > Alert > User Alert > Create Rule화면 이동- Type =
Table선택 - Stat Name에서 모니터링하려는 데이터베이스 지표 선택
- Check Interval, Check Hold Time 설정
- Target 지정 후 저장
3. 이벤트 알람 (Event Alert)
3-1. Event Alert List (이벤트 알람 목록)
메뉴 경로: Alert > Event Alert List
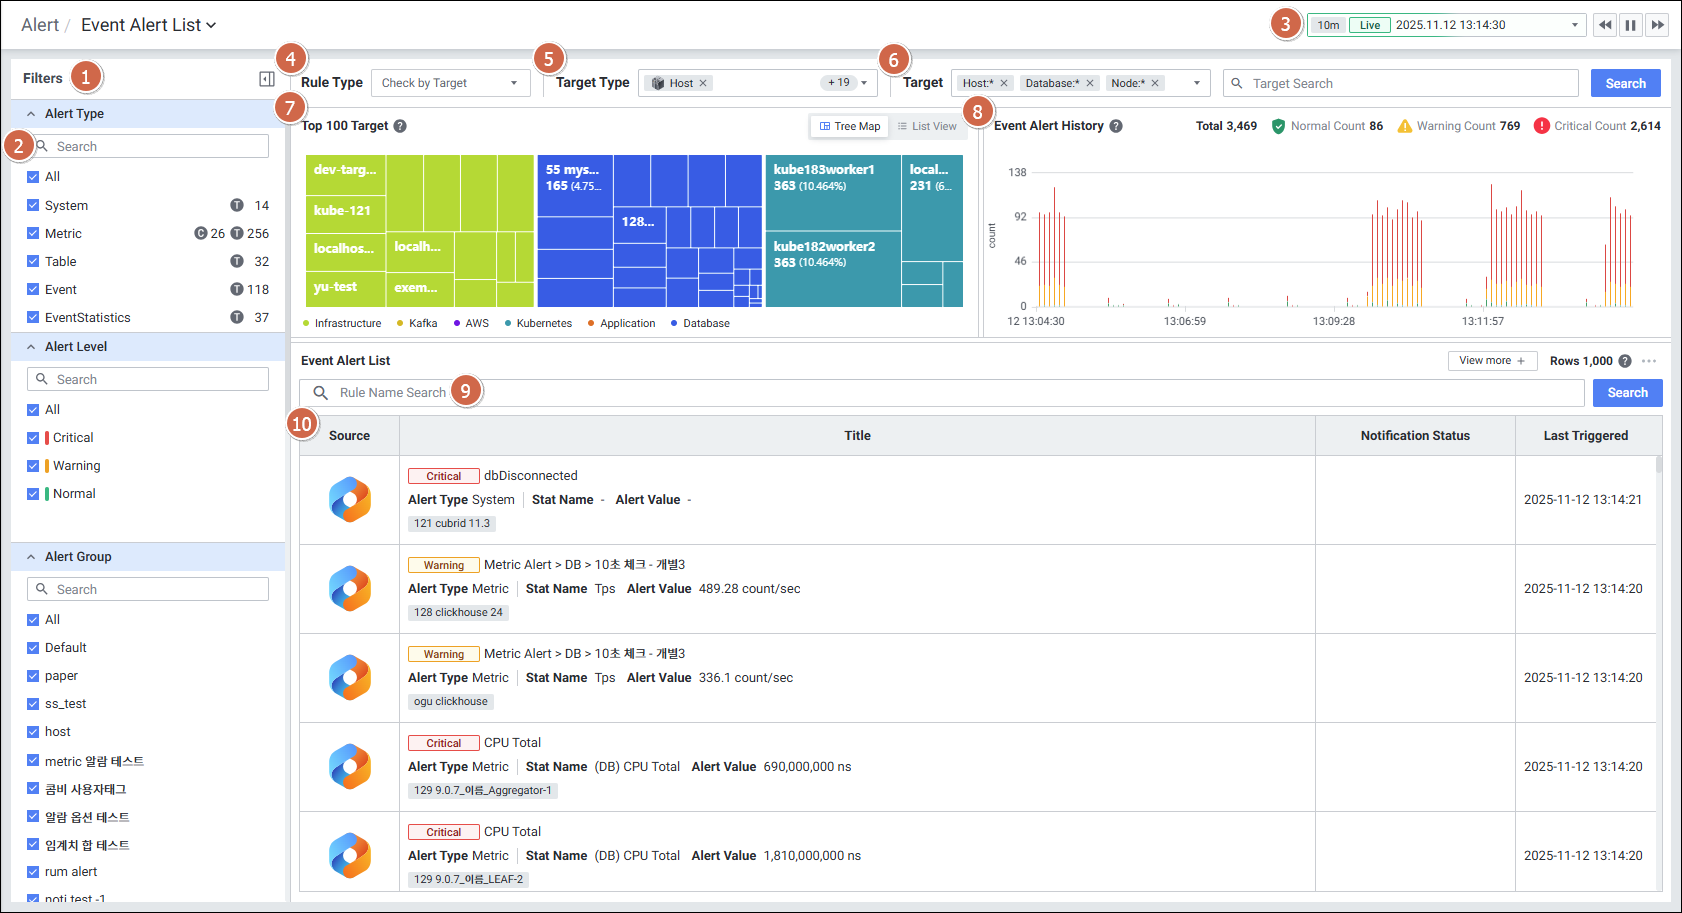
| 순번 | 항목 | 내용 |
|---|---|---|
| 1 | Filters | Alert 타입, 레벨, 그룹명 필터 선택 |
| 2 | Search | Alert 타입, 레벨, 그룹명 검색 |
| 3 | Global Time | 실시간 데이터 확인 |
| 4 | Rule Type | 룰 타입 선택 |
| 5 | Target Type | 타겟 타입 선택 |
| 6 | Target | 타겟 선택 |
| 7 | Top 100 Target | 대상별 알림 발생 횟수를 집계하여 Top 100 기준 백분율로 계산한 정보 표시 (Tree Map / List View) |
| 8 | Event Alert History | 이벤트 알람 이력 |
| 9 | Rule Name Search | 이벤트 알람 목록 내 검색 |
| 10 | Grid | 이벤트 알람 목록 (Source, Title, Notification Status, Last Triggered) |
3-2. Pod Event 알람 발생 조건
이벤트 알람의 Aggregation Scope 조건을 적용하여 이전 이벤트와의 차이값(delta_count)인 check_count 값을 기반으로 알람이 발생됩니다.
| 데이터 | 설명 |
|---|---|
| delta_count | 직전 이벤트 대비 늘어난 이벤트 카운트 (agent → receiver 전달값) |
| check_count | 집계범위(Aggregation Scope) 내 delta_count 합계. 알람 발생 기준 카운트 |
참고:
alert_history_v2_dist테이블의 value 컬럼에서 알람 발생 시마다 해당 이벤트 카운트 확인 가능
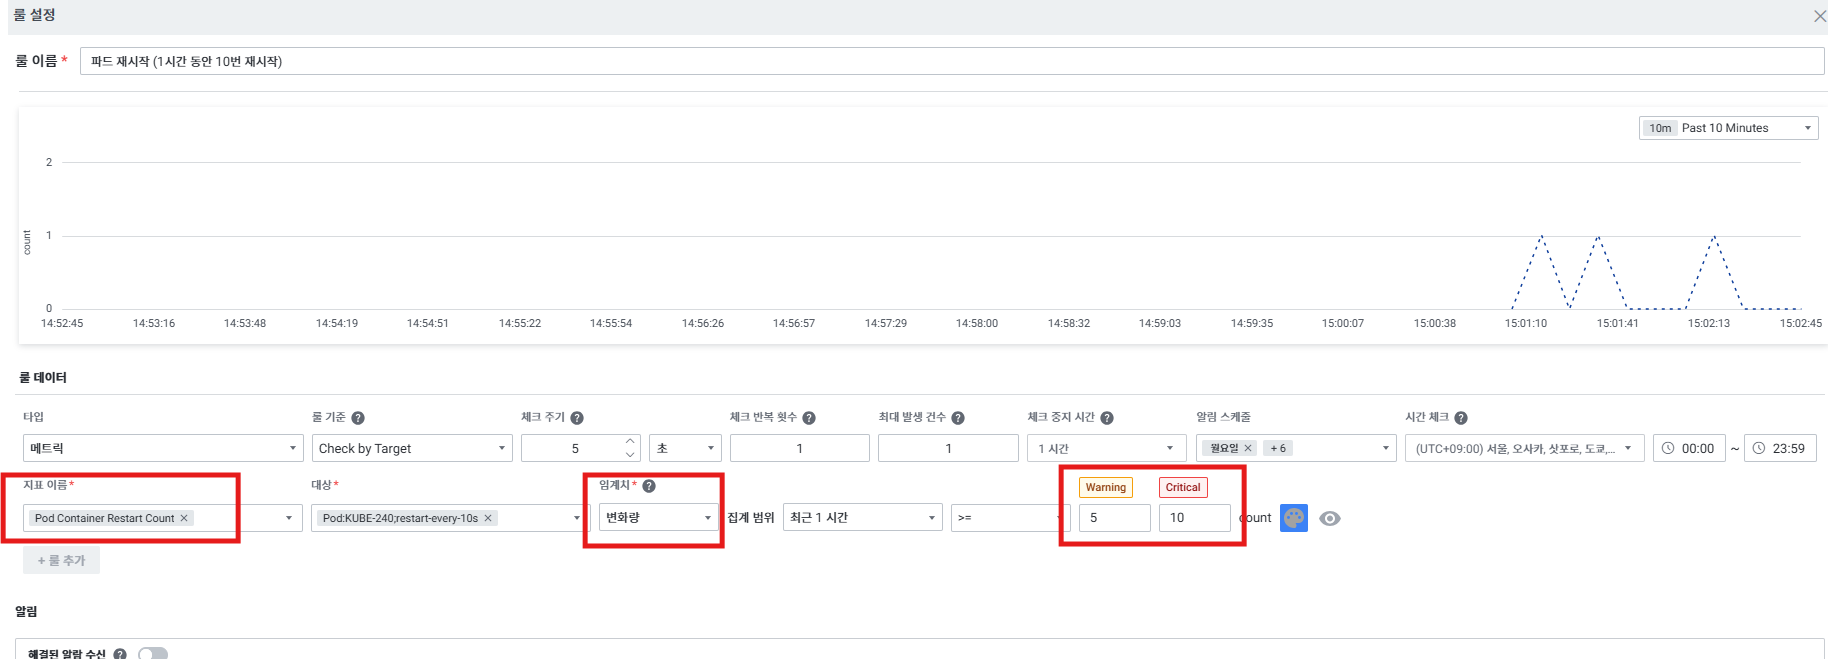
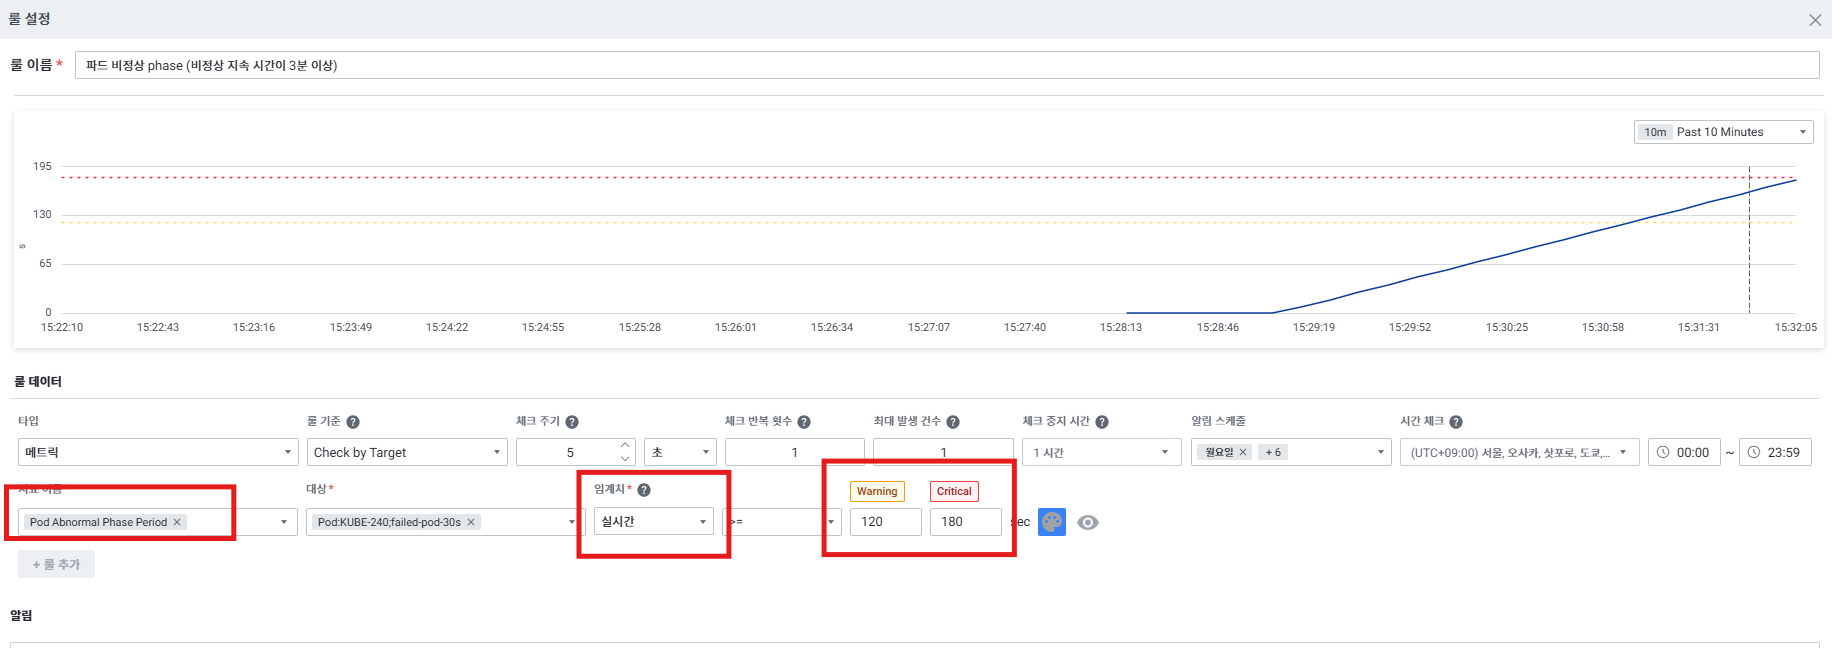
3-3. K8s Pod 상태 알람 설정 예시
K8s Pod 상태 모니터링을 위한 3가지 신규 메트릭을 활용한 알람 설정:
| 메트릭 | 설명 |
|---|---|
| Pod Container Restart Count | 파드 내 컨테이너의 restart count 합계 (단위: count) |
| Pod Abnormal Phase Period | 파드의 비정상 phase 지속 시간 (단위: sec) |
| Pod Normal Phase Period | 파드의 정상 phase 지속 시간 (단위: sec) |
알람 설정 예시:
1. Pod 재시작 횟수 알람 (1시간 동안 5회/10회 이상):
- 메트릭:
Pod Container Restart Count - Warning >= 5 count, Critical >= 10 count
2. Pod 비정상 상태 지속 알람 (2분/3분 이상 RUNNING 아닌 경우):
- 메트릭:
Pod Abnormal Phase Period - Warning >= 120sec, Critical >= 180sec
4. 알람 수신 설정 (Notification 설정)
4-1. Group Notification 설정 (그룹 단위 알람 수신)
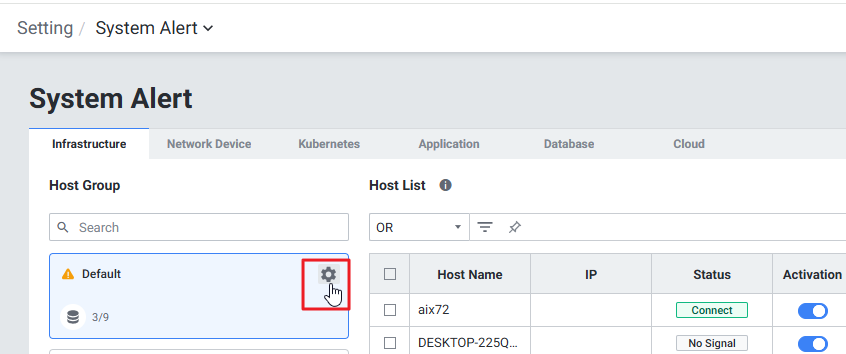
메뉴 경로: Setting > System Alert > Group 편집
타겟 그룹별로 Notification 수신을 설정합니다.
Step 1. Setting > System Alert > Group 편집 화면 진입
Step 2. Group Notification Setting에서 Notification 알람 설정
- Notification 설정
- Write Content에 알람 내용 작성
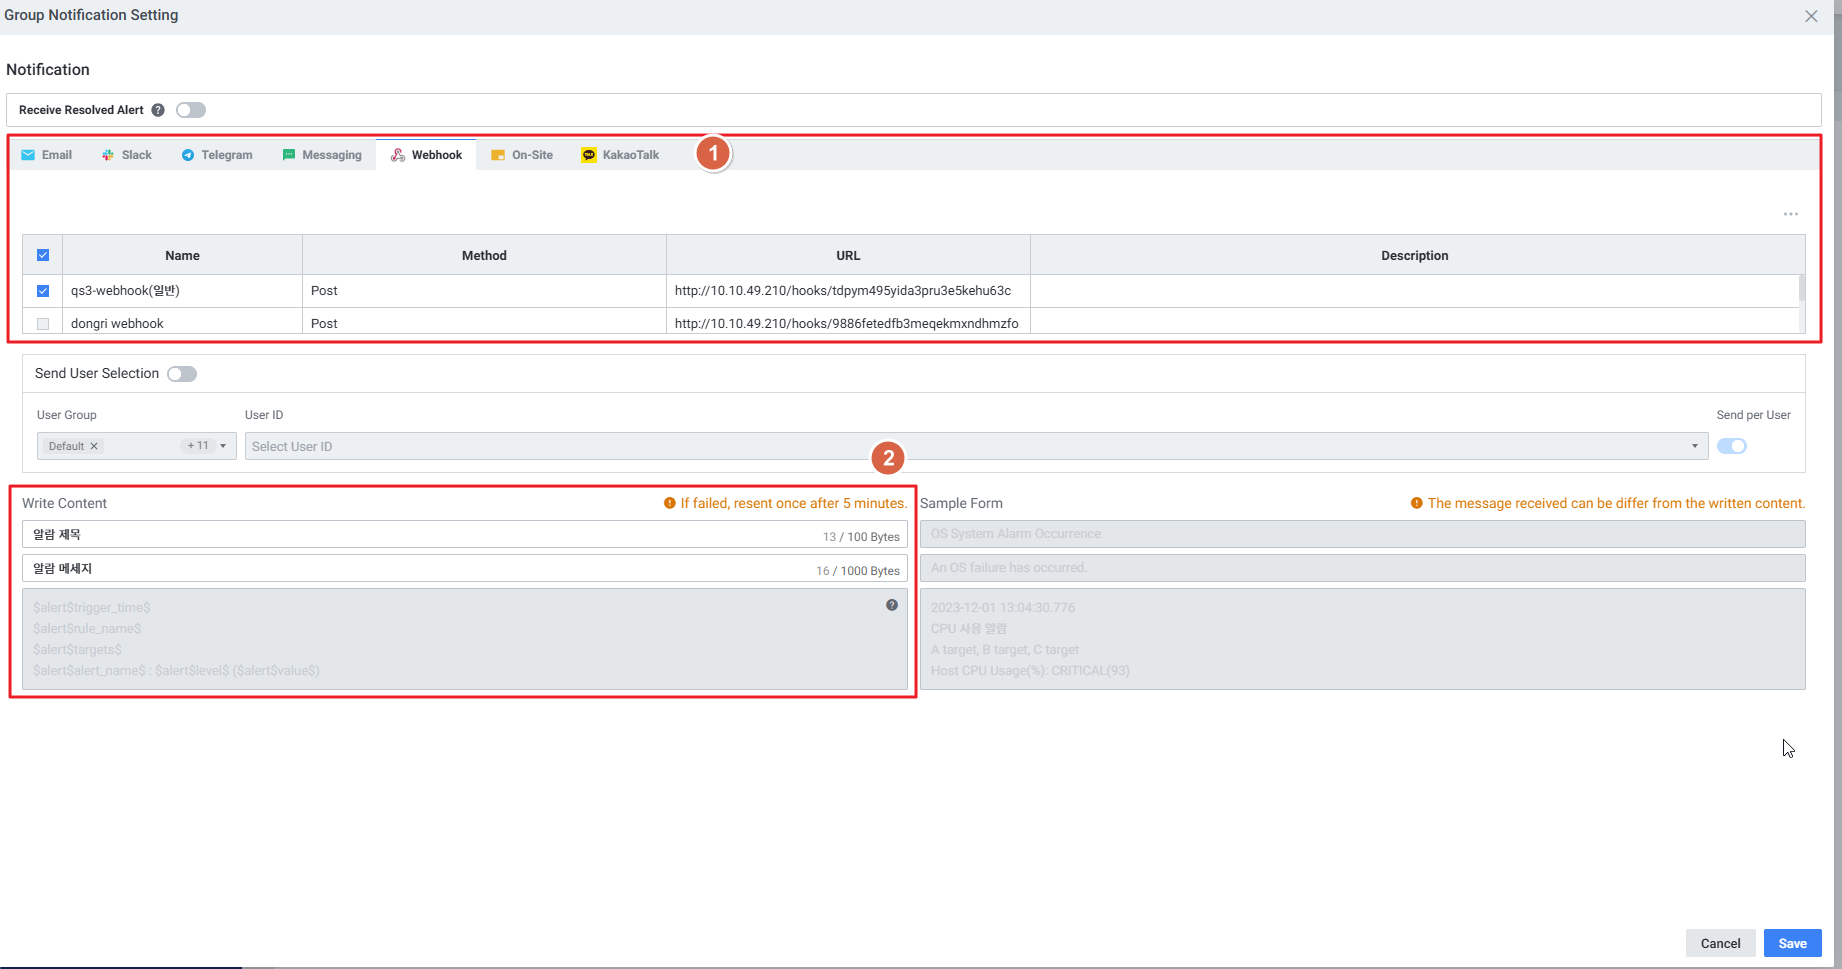
Step 3. 선택한 Notification 아이콘이 Group 리스트에 표시됩니다.
- 해당 Group 내의 모든 타겟에 해당 Notification이 적용됩니다.
- 단, 타겟에 Isolated Sending이 활성화된 경우, Group의 Notification이 적용되지 않습니다.

User Alert도 동일하게 설정 가능합니다.
4-2. Custom Notification 설정 (타겟 개별 알람 수신)
메뉴 경로: Setting > System Alert > 타겟 리스트 > Custom Notification 편집
타겟 개별 Notification을 설정합니다.

4-3. 사용자 선택 발송 (Webhook 사용자별 발송)
메뉴 경로: Alert > Rule Setting > Webhook > 사용자 선택 발송
로그인된 사용자 외 등록된 사용자 정보를 활용하여 웹훅 알람을 발송합니다.
Step 1. 웹훅 등록 및 파라미터 설정
발송할 웹훅 URL 및 Request Body 내 사용자 파라미터를 등록합니다.
- 사용자 파라미터 등록 시 등록된 사용자 ID 수 만큼 번호를 지정하여 파라미터를 매핑할 수 있습니다.
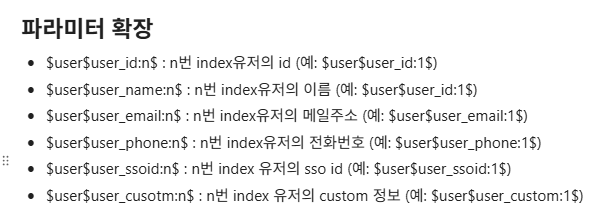
Step 2. 사용자 선택 발송 활성화 및 사용자 ID 등록
- 등록된 순서대로 파라미터 값이 매핑됩니다.
- 예:
$user$user_email:1$→ phlee@ex-em.com,$user$user_email:2$→ cable@ex-em.com
주의: 사용자 선택 발송이 비활성화되거나
환경설정 > 사용자 관리 > 문자 및 이메일항목이 비활성화된 경우, 파라미터 매핑 기능이 동작하지 않아 매핑되지 않은 값(문자열 그대로) 출력
4-4. Alert 파라미터 공통 정의
Alert 종류에 관계없이 Notification 발송 시 사용 가능한 공통 파라미터입니다.
$alert$trigger_time$    → 알람 발생 시각
$alert$rule_name$       → 알람 룰 이름
$alert$target$          → 알람 발생 대상
$alert$alert_name$      → 알람 이름
$alert$level$           → 알람 레벨
$alert$value$           → 알람 값
표준 포맷:
$alert$trigger_time$
$alert$rule_name$
$alert$targets$
$alert$alert_name$ : $alert$level$ ($alert$value$)
Notification 발송 예시:
2023-12-01 13:04:30.776
CPU 사용 알람
A target, B target, C target
Host CPU Usage(%) : CRITICAL (93)
Alert 유형별 파라미터 차이
| 유형 | rule_name | alert_name | value |
|---|---|---|---|
| System Alert | 고정된 룰명 (시스템 정의) | 시스템 알람 유형 (disconnected, Unknown 등) | 없음 |
| User Alert Metric | 사용자 정의 룰명 | 알람 지표 이름 | 측정 수치 포함 |
| User Alert Event | 사용자 정의 룰명 | 이벤트 유형 | - |
5. Webhook 연동
메뉴 경로: Setting > Alert > Notification > Webhook > Add Notification
알람 발생 내역을 외부 시스템으로 HTTP 요청을 통해 전달하는 기능입니다.
Alert Detail Slide에서 Notification 채널 확인:
메뉴 경로: Dashboard 또는 Alert > 룰 클릭 > Alert Detail Slide
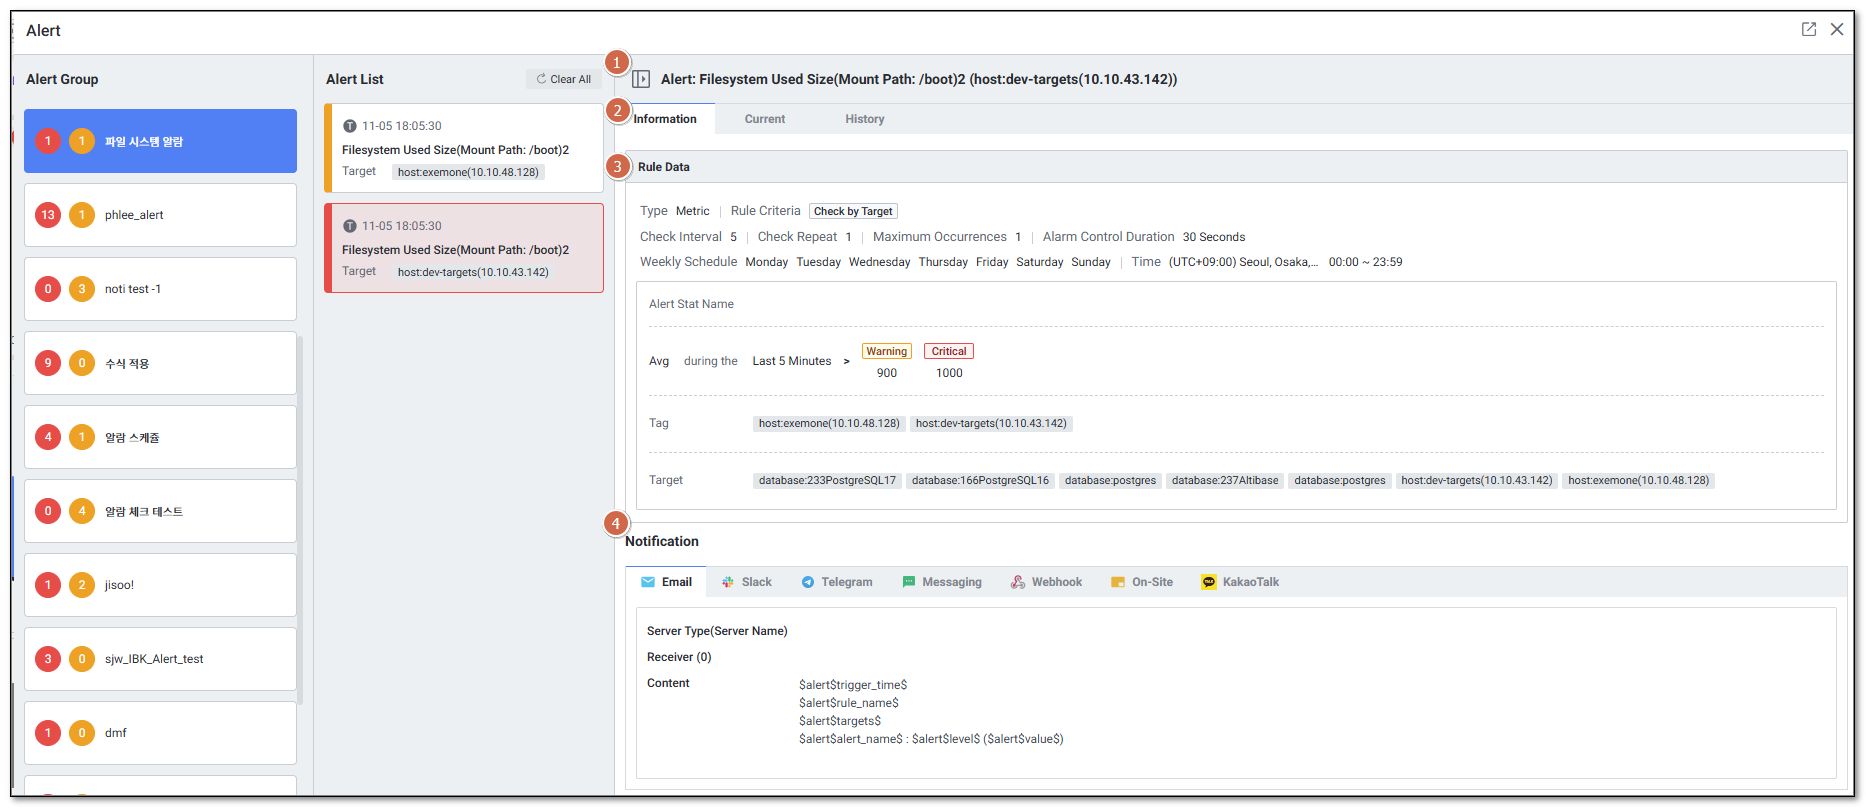
| 순번 | 항목 | 내용 |
|---|---|---|
| 1 | Title | Rule 이름 |
| 2 | Tab | Information / Current / History |
| 3 | Rule Data | Rule 상세 정보 |
| 4 | Notification | Email, Slack, Telegram, SMS, Webhook, On-Site, KakaoTalk 등 알람 채널 |
Webhook TLS 설정 (지원 버전:
exemone-alerter v3.0.412.7.0)Docker 환경:
docker-compose.yml의 alerter 환경변수에EXEMONE_WEBHOOK_NOTIFIER_INSECURE_SKIP_VERIFY: true추가Binary 환경:
${EXEMONE_HOME}/services/exemone-alerter/.env에EXEMONE_WEBHOOK_NOTIFIER_INSECURE_SKIP_VERIFY=true추가 후 재기동
Webhook Payload AES256 암호화 (지원 버전:
exemone-alerter v3.0.508.59)송신: 평문 → AES256 암호화 → Base64 인코딩 → 전송 수신: 수신 → Base64 디코딩 → AES256 복호화 → 평문
alerter.yaml에messenger-cipher.enabled: true및 96자리 hex 키 설정 필요
6. Telegram 연동
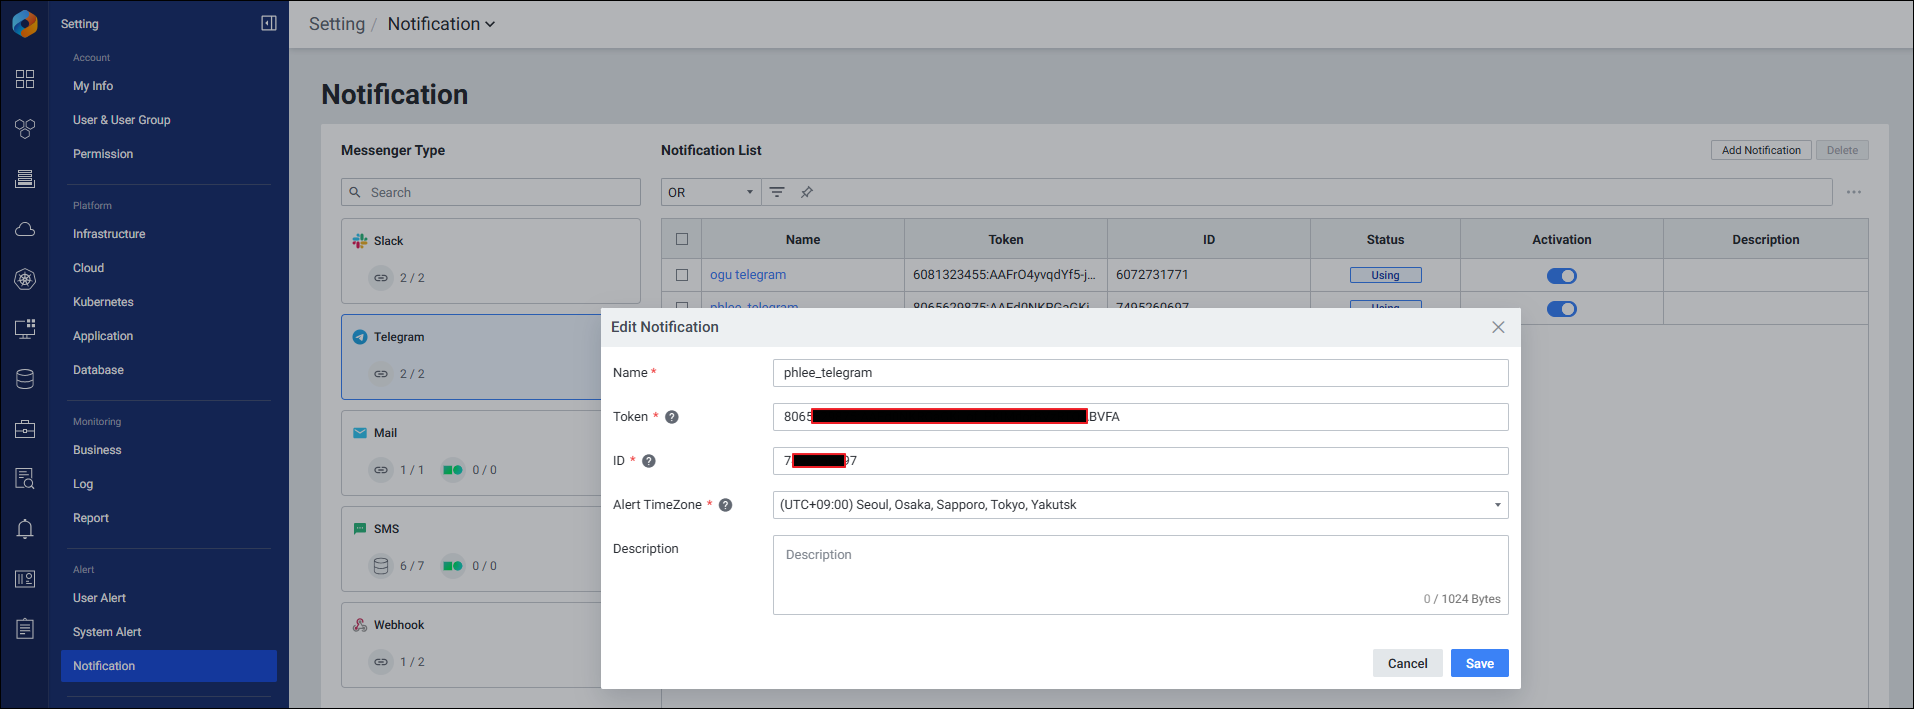
메뉴 경로: Setting > Notification > Telegram > Add Notification
등록된 알람(사용자 및 시스템 알람) 발생 내역을 Telegram으로 전달합니다.
Step 1. Telegram Bot 생성
Token 값 확인
- Telegram (모바일 또는 PC)에서 "BotFather" 검색 후 채팅방 생성
- 아래 순서로 입력하여 Bot 생성:
/start→/newbot→{채팅방명}
- 생성 완료 후 Token 값 확인

ID(Chat ID) 값 확인
- 아래 URL에서 확인된 Token 값으로 변경 후 접속:
https://api.telegram.org/bot[Token 값]/getUpdates
- 처음 접속 시
ok: true값이 출력되며, 생성한 채팅방에서/start명령 입력 - 페이지 새로고침 시 ID 값 확인

Step 2. Telegram Notification 등록
Setting > Notification > Telegram > Add Notification 선택 후 알람 등록
Telegram 설정 화면 구성:
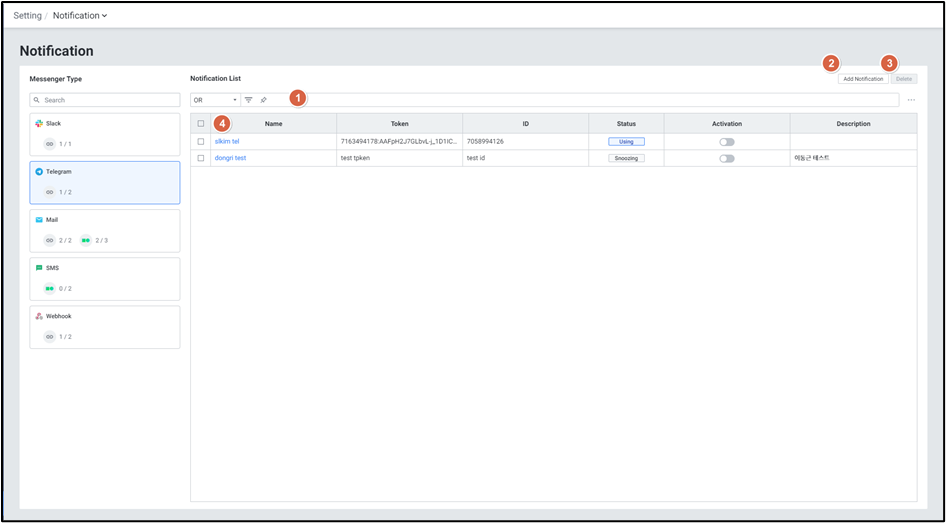
| 순번 | 항목 | 내용 |
|---|---|---|
| 1 | Filter | Or/And 조건으로 Notification 목록 필터 |
| 2 | Add Notification | Add Notification 팝업창 열기 |
| 3 | Delete | 선택된 Notification 삭제 |
| 4 | Notification List | Notification 목록 (Name, Token, ID, Status, Activation, Description) |
Add Notification 팝업 항목:
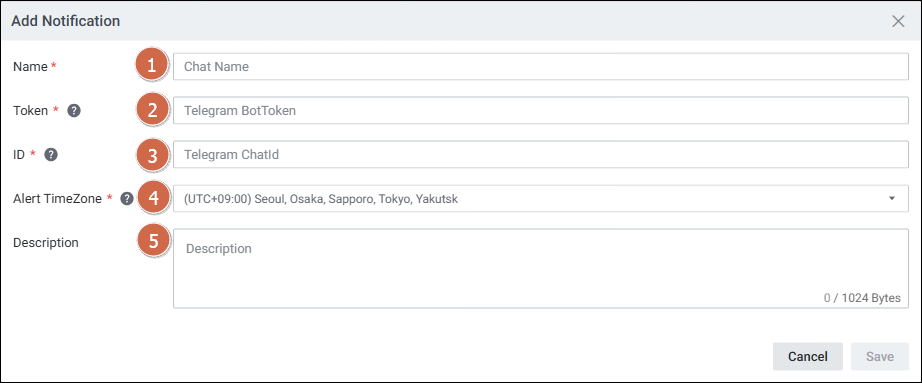
| 순번 | 항목 | 내용 |
|---|---|---|
| 1 | Name | Notification 이름 설정 |
| 2 | Token | Notification을 전달받을 Bot Token 설정 |
| 3 | ID | 생성된 Bot의 Chat ID 설정 |
| 4 | Alert TimeZone | 알람 발생 시간의 표준 시간대 설정 |
| 5 | Description | Notification에 대한 상세 설명 |
Step 3. Telegram 알람 연동
사용자 알람 연동:
Rule Setting > Notification > Telegram 탭에서 등록한 Telegram 선택 후 저장
시스템 알람 연동:
Custom Notification > Telegram 탭에서 등록한 Telegram 선택 후 저장
7. KakaoTalk 연동
메뉴 경로: Setting > Notification > KakaoTalk > Add Notification
등록된 알람 발생 내역을 KakaoTalk 채널 메시지(알림톡)로 전달합니다. NCP(Naver Cloud Platform)에 등록된 KakaoTalk 채널을 연동합니다.
사전 조건: NCP 알림톡 등록이 완료되어 있어야 합니다.
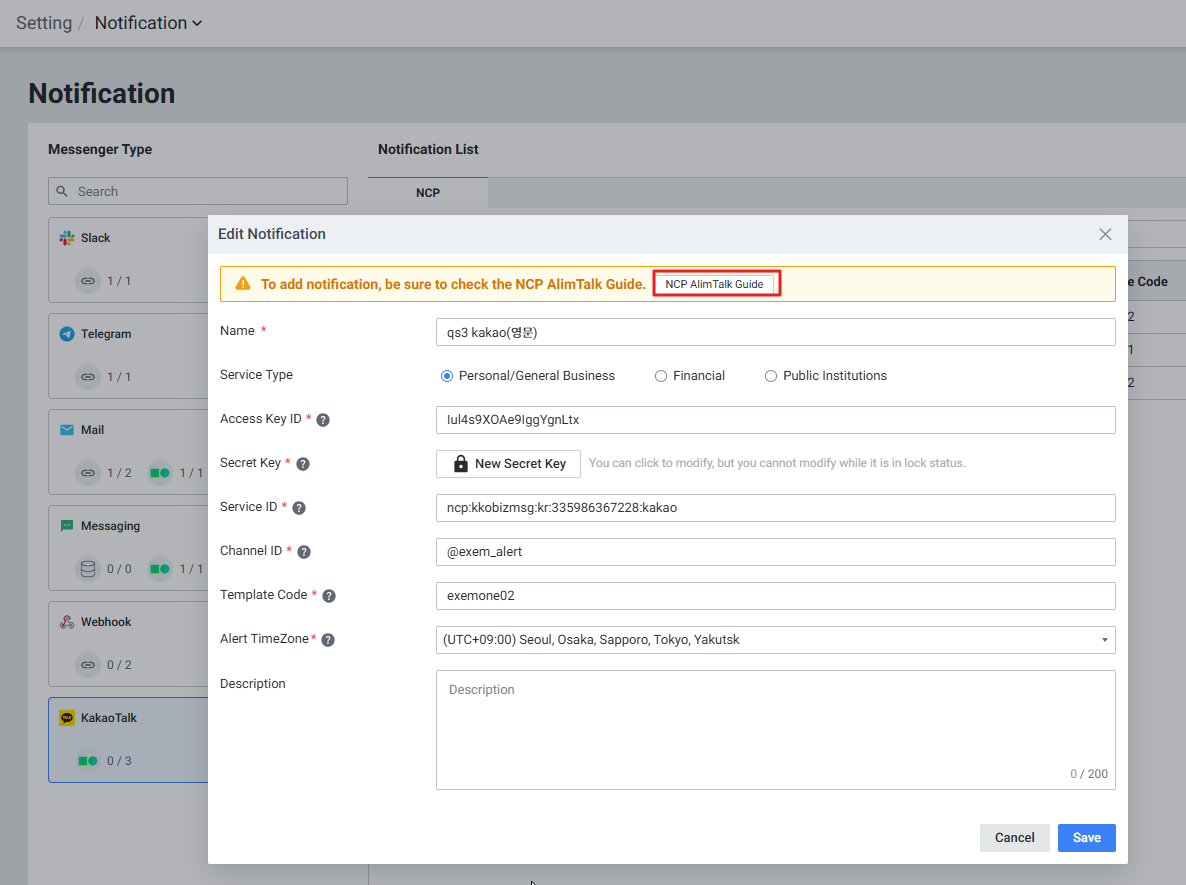
Step 1. NCP AlimTalk 등록 가이드 확인
Setting > Notification > KakaoTalk > Add Notification 에서 [NCP AlimTalk Guide] 버튼 클릭 시 가이드 확인 가능
Step 2. KakaoTalk Notification 등록
Setting > Notification > KakaoTalk > Add Notification 선택 후 알람 등록
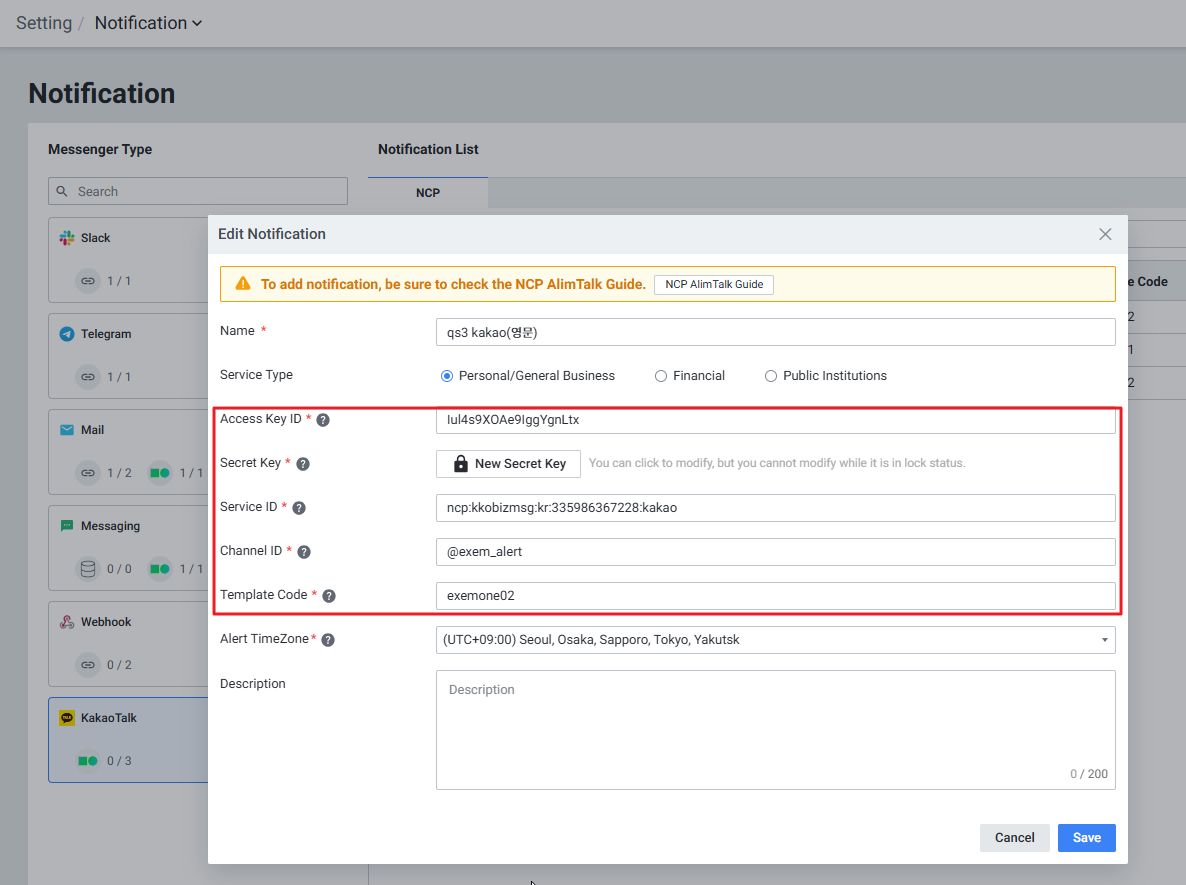
KakaoTalk 설정 화면 구성:
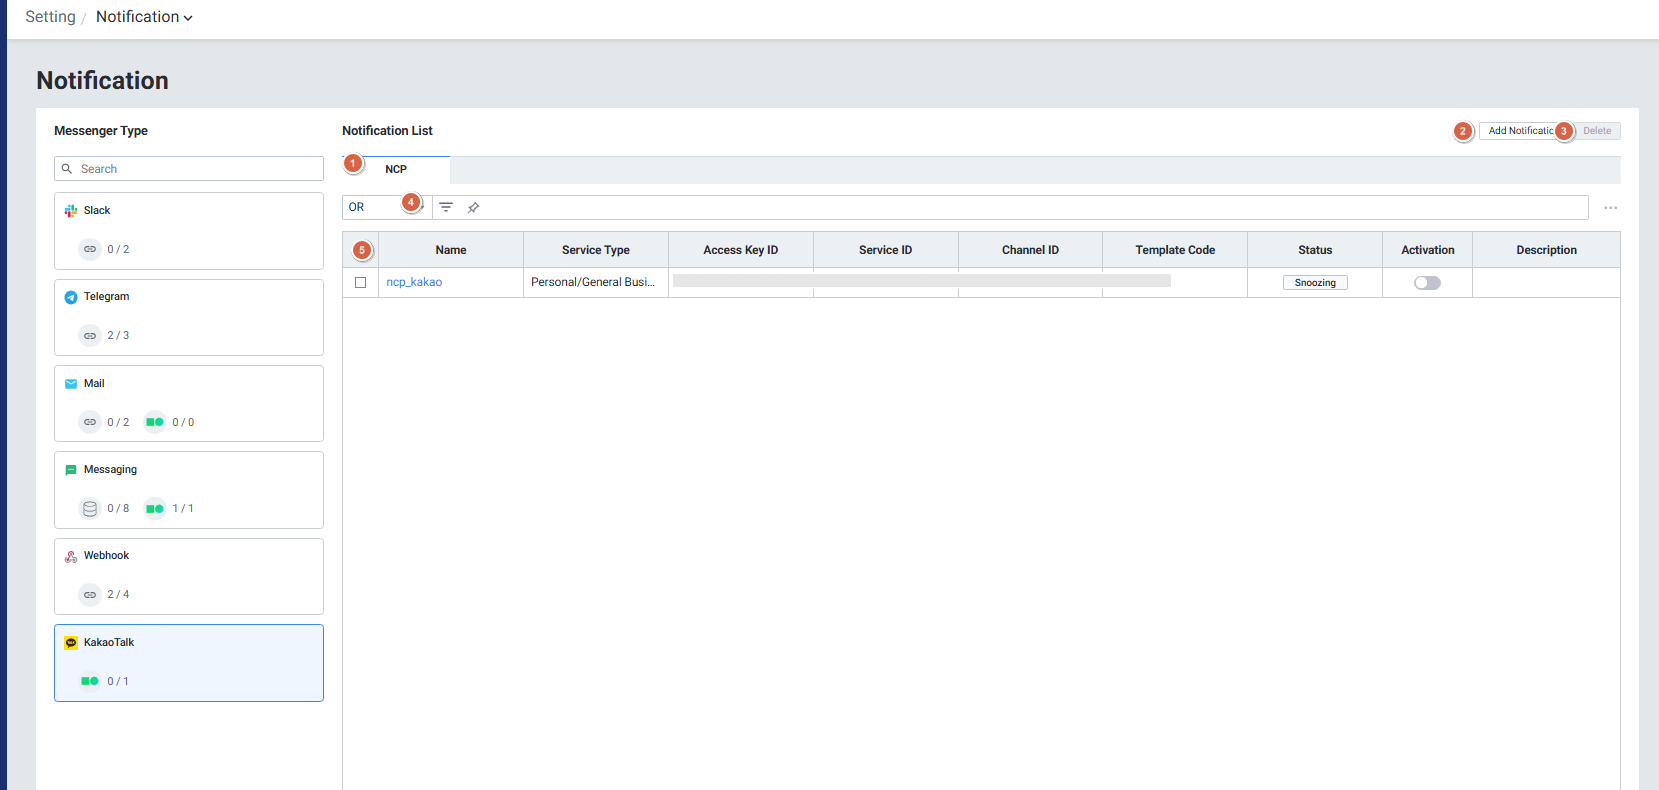
| 순번 | 항목 | 내용 |
|---|---|---|
| 1 | NCP | NCP 카카오톡 알림 목록 |
| 2 | Add Notification | 알림 추가 팝업 |
| 3 | Delete | 선택된 Notification 삭제 |
| 4 | Filter | Or/And 조건으로 Notification 목록 필터 |
| 5 | Grid | 알림 목록 (Name, Service Type, Access Key ID, Channel ID, Template Code, Status, Activation, Description) |
Add Notification 팝업 항목:

| 순번 | 항목 | 내용 |
|---|---|---|
| 1 | NCP AlimTalk Guide | NCP 알림톡 등록 가이드 팝업 확인 |
| 2 | Name | 알림톡 이름 입력 |
| 3 | Service Type | 개인/일반 기업용, 금융 클라우드, 공공 기관용 선택 |
| 4 | Access Key ID | 네이버 클라우드 플랫폼 > 마이페이지 > 계정관리 > 인증키 관리에서 확인 |
| 5 | Secret Key | 네이버 클라우드 플랫폼 > 마이페이지 > 계정관리 > 인증키 관리에서 확인 |
| 6 | Service ID | NCP 콘솔 > Simple & Easy Notification Service > 프로젝트 목록에서 확인 (프로젝트 생성 후 자동 발급) |
| 7 | Channel ID | 카카오 비즈니스 채널명 ID |
| 8 | Template Code | NCP 템플릿 관리에 등록된 코드 |
Step 3. KakaoTalk 알람 연동 및 활성화
사용자 알람 연동:
Rule Setting > Notification > KakaoTalk 탭에서 등록한 KakaoTalk 선택 후 저장
시스템 알람 연동:
Custom Notification > KakaoTalk 탭에서 등록한 KakaoTalk 선택 후 저장
알람 활성화:
알람 발생 및 전송을 위해 Activation 및 Notification을 모두 활성화합니다.

8. Notification 미발생 시 체크 사항
메뉴 경로: Setting > System Alert > Notification 설정 확인
CASE 1. 알람 설정 유지 상태 확인
- 시스템 알람의 설정값(활성화, 임계치 등)이 정상적으로 유지되는지 확인
- 최근 변경 이력이나 비정상/비활성화 상태 점검
- Group Notification, 타겟 개별 Notification 설정 확인
CASE 2. 알람 발생 히스토리와 발송 이력 비교
- 알람 발생 히스토리와 발송 이력을 비교하여 누락·오해 없는지 점검
- 실제 발생한 알람이 정상적으로 발송되었는지 확인
CASE 3. DB 조인으로 발생/발송 이력 비교
alert_history_dist와notification_history_id를result_id로 조인하여 알람 발생/발송 이력 매칭 여부 확인- 조인 결과가 없다면 해당 시점의 알람 관련 로그 상세 분석
CASE 4. Alerter 모듈 로그 확인
아래 키워드로 이슈 발생 시점 파악:
[SYSTEM_ALERT][WEBHOOK NOTIFIER][NOTIFIER][WEBHOOK ALARM]— 예:[WEBHOOK ALARM] webhook notification failed[ALARM]— 예:[ALARM] alert rule is muted,[ALARM] skip notification
9. 메뉴 경로 요약
| 기능 | 메뉴 경로 |
|---|---|
| 사용자 알람 목록 | Setting > Alert > User Alert > Rule List |
| 사용자 알람 룰 생성 | Setting > Alert > User Alert > Create Rule |
| 이벤트 알람 목록 | Alert > Event Alert List |
| 시스템 알람 그룹 Notification 설정 | Setting > System Alert > Group 편집 > Group Notification Setting |
| 타겟 개별 Notification 설정 | Setting > System Alert > 타겟 리스트 > Custom Notification 편집 |
| 외부 알람 설정 | Setting > Alert > External Alert |
| Webhook 설정 | Setting > Alert > Notification > Webhook > Add Notification |
| Telegram 등록 | Setting > Notification > Telegram > Add Notification |
| KakaoTalk 등록 | Setting > Notification > KakaoTalk > Add Notification |
| 알람 활성화 | 각 Rule 또는 Notification 화면의 Activation 토글 |
참고 문서 URL
- Alert Notification Group/Custom Notification 설정 가이드: https://app.clickup.com/25540965/v/dc/rbeb5-403498/rbeb5-2846878
- Table Alert 등록 가이드: https://app.clickup.com/25540965/v/dc/rbeb5-403498/rbeb5-3111478
- System Alert Notification 미발생 체크 사항: https://app.clickup.com/25540965/v/dc/rbeb5-403538/rbeb5-2846898
- Pod Event Alert 발생 조건: https://app.clickup.com/25540965/v/dc/rbeb5-403498/rbeb5-3174538
- Alert 유형별 파라미터 설정 가이드: https://app.clickup.com/25540965/v/dc/rbeb5-403498/rbeb5-3118758
- K8s Metric Alert Pod 상태 알람 가이드: https://app.clickup.com/25540965/v/dc/rbeb5-403498/rbeb5-2846498
- Telegram 연동 가이드: https://app.clickup.com/25540965/v/dc/rbeb5-403498/rbeb5-2494538
- KakaoTalk 연동 가이드: https://app.clickup.com/25540965/v/dc/rbeb5-403498/rbeb5-2579398
- Setting > Alert > Notification > Telegram (메뉴얼): https://app.clickup.com/25540965/v/dc/rbeb5-416338/rbeb5-2695078
- Setting > Alert > Notification > KakaoTalk (메뉴얼): https://app.clickup.com/25540965/v/dc/rbeb5-416338/rbeb5-2780598
- Event Alert List (메뉴얼): https://app.clickup.com/25540965/v/dc/rbeb5-416338/rbeb5-3187058
- Rule Alert List (메뉴얼): https://app.clickup.com/25540965/v/dc/rbeb5-416338/rbeb5-2780618
- Rule Setting Event 타입 (메뉴얼): https://app.clickup.com/25540965/v/dc/rbeb5-416338/rbeb5-2694258
- Rule Setting Event Statistics 타입 (메뉴얼): https://app.clickup.com/25540965/v/dc/rbeb5-416338/rbeb5-3176758
- External Alert (메뉴얼): https://app.clickup.com/25540965/v/dc/rbeb5-416338/rbeb5-3231958
- 사용자 선택 및 사용자별 발송 등록 가이드: https://app.clickup.com/25540965/v/dc/rbeb5-403498/rbeb5-3129158
Alert Detail Slide (메뉴얼): https://app.clickup.com/25540965/v/dc/rbeb5-416338/rbeb5-2689298